 Save
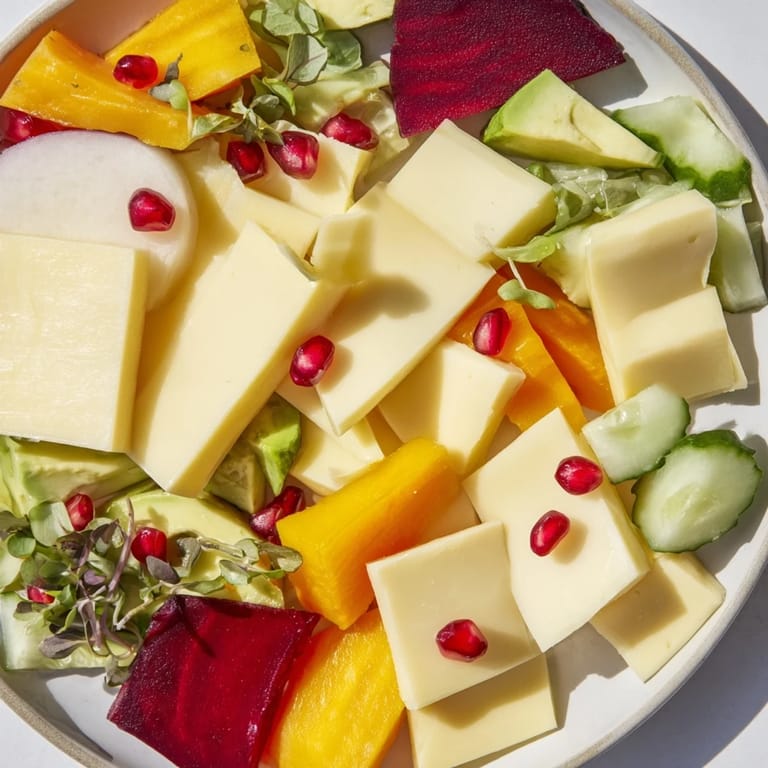
Save I first discovered the magic of geometric plating at a small gallery opening in Barcelona, where a minimalist chef had transformed an ordinary charcuterie board into a tessellating mosaic that stopped everyone in their tracks. The moment I saw how each triangular slice interlocked like a puzzle, I knew I had to recreate that sense of wonder in my own kitchen. There's something deeply satisfying about turning humble ingredients into an edible work of art, and this Tessellation Triangle has become my signature move for impressing guests without breaking a sweat.
I'll never forget hosting my sister's engagement party and watching everyone's faces light up when I unveiled this board. People who normally rush through appetizers actually paused, admired it, and asked how long it took. The answer surprised them—just an hour of focused cutting and arranging. That moment taught me that presentation is a form of love in the kitchen, and taking time to create something beautiful before serving it says more than words ever could.
Ingredients
- Aged Manchego cheese (100 g, chilled): This nutty Spanish cheese holds its shape beautifully when sliced thin and adds a sophisticated, slightly savory note that anchors the whole display. Chill it well before cutting—warm cheese crumbles and ruins your geometric perfection
- Sharp white cheddar (100 g, chilled): The contrast of bright yellow against the other ingredients creates visual impact. Sharp varieties cut cleaner than mild ones, and the flavor pop justifies the extra cost
- Creamy Havarti cheese (100 g, chilled): This Danish cheese has a subtle sweetness and melts slightly on the tongue, offering textural variety. It's the softest of the three, so handle it gently during cutting
- Medium cucumber: Choose one that's firm and dark green, with minimal seeds inside. The water content means it won't hold triangular edges as crisply as denser vegetables, so slice just before assembly
- Watermelon radish (1 medium, peeled): This is your secret weapon for visual drama—those pink and white concentric circles are nature's tessellation already built in. Slice it thin to showcase the pattern
- Ripe mango (1, peeled): Select one that yields slightly to pressure but isn't mushy. The golden color adds warmth, and the natural sweetness balances the savory cheeses beautifully
- Red bell pepper (1, seeded): Raw bell peppers have a satisfying crunch and their bold red is essential for color blocking in your design. Thicker walls slice more cleanly than thin-walled peppers
- Small firm avocado (1): This is the ingredient that made me want to pull my hair out until I learned the trick: slice and assemble it last, keeping it in ice water until the final moment. Otherwise, oxidation turns it brown and your masterpiece looks tired
- Small cooked beet (1, peeled): Pre-cooked and chilled, this adds earthiness and a jewel-tone burgundy that no raw vegetable can match. The slightly sweet flavor rounds out the savory cheese notes
- Large gluten-free crackers or lavash sheets (6): These serve double duty as both structural elements and flavor carriers. Lavash sheets offer flexibility for perfect triangles, while crackers add satisfying crunch
- Fresh microgreens (2 tablespoons): These are your final flourish—choose varieties with delicate leaves that nestle into the crevices between triangles. They add freshness and a professional touch
- Pomegranate arils (2 tablespoons): Those jewel-like seeds burst with tartness and add an unexpected flavor dimension. They're also nature's way of adding depth without disrupting your geometric pattern
- Honey or fig jam (2 tablespoons, optional): A drizzle at the end adds sweetness and sophistication. I prefer fig jam because it doesn't run, but either works beautifully
- Flaky sea salt and freshly cracked black pepper: These finish the board with flavor complexity. The flaky salt dissolves differently than table salt, adding texture notes that ground the whole experience
Tired of Takeout? 🥡
Get 10 meals you can make faster than delivery arrives. Seriously.
One email. No spam. Unsubscribe anytime.
Instructions
- Setting Up Your Workspace:
- Before you cut a single ingredient, create your command center. Clear a large cutting board or work surface and place a damp towel underneath it—this prevents sliding when you're applying pressure with your knife, and nothing ruins precision cutting like a moving surface. Gather all your tools and ingredients in the order you'll use them. I arrange my cheeses on one side, vegetables in the middle, and crackers at the end. This simple organization keeps you focused and prevents the frustrated searching that kills momentum.
- Preparing Your Ingredients for the Cut:
- Chill everything for at least 30 minutes before slicing. Cold ingredients are firm and hold their shape; room-temperature cheese crumbles and avocado smushes. Pat everything dry with paper towels—moisture is the enemy of clean edges. Using a vegetable peeler, remove any waxy coating from the cucumber and bell pepper, as this can make them slippery during cutting.
- Mastering the Triangle Cut:
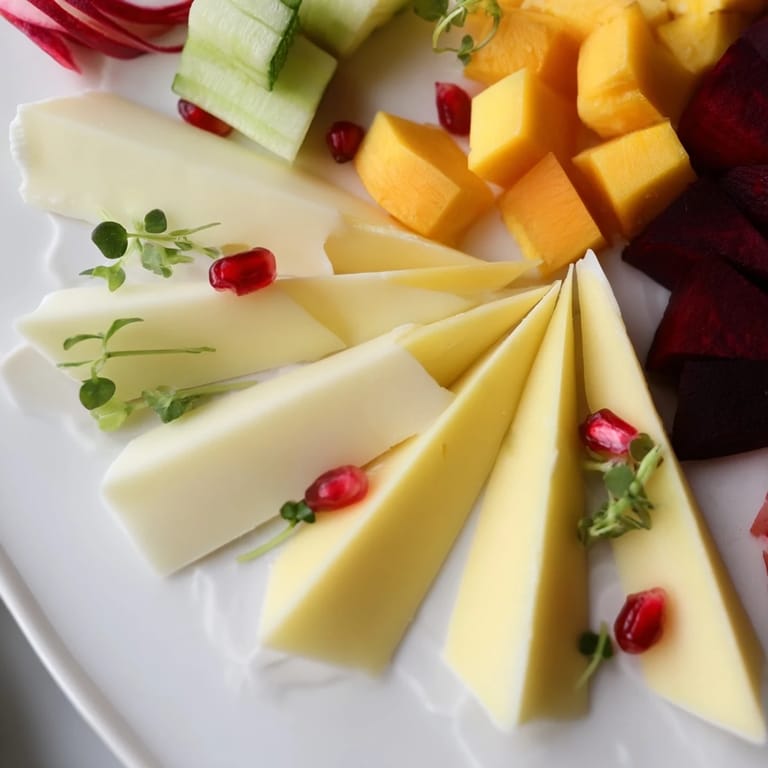
- This is where patience becomes your superpower. Using a sharp chef's knife and a metal ruler, slice each ingredient into slabs approximately 5 mm (about 1/4 inch) thick. Lay each slab flat on your board. Now comes the meditation: using your ruler as a guide, mark out an equilateral triangle with sides of about 5 cm (2 inches). Press your knife firmly and use long, smooth strokes—never saw back and forth, as this creates ragged edges that ruin the tessellation effect. Work slowly. I put on music and treat this like a mindful practice rather than a task to rush through. Each ingredient behaves differently: cheese might crumble at the edges if your knife isn't sharp enough, while cucumber releases water if you apply too much pressure. Listen to your knife and feel the resistance. You're looking for clean, sharp edges and flat faces with no unevenness.
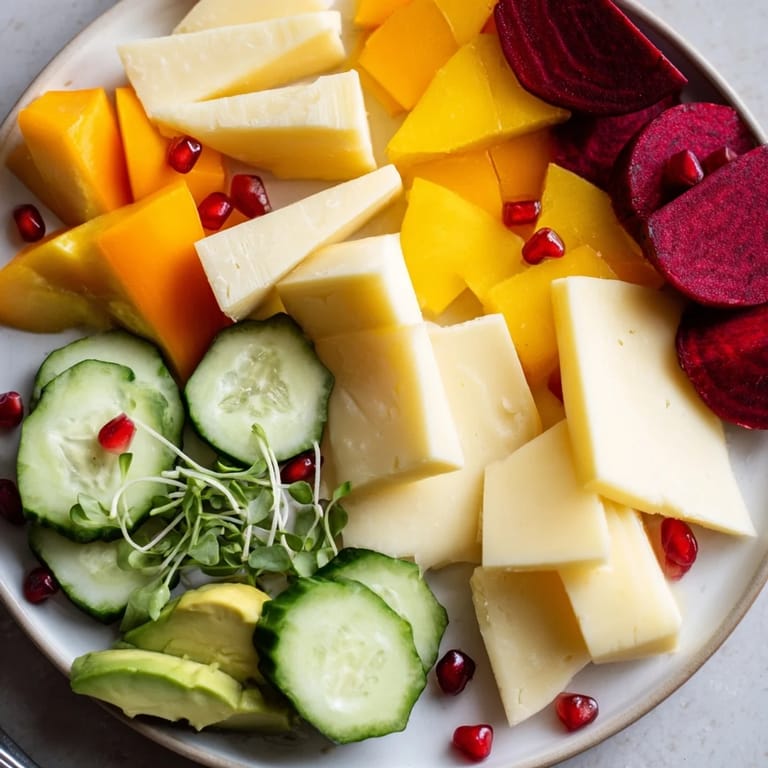
- Building Your Tessellating Mosaic:
- This is where the magic happens. Choose a corner of your serving platter and begin placing triangles, interlocking them tightly like puzzle pieces. Start with your color scheme in mind—I like to create a gradation from deep burgundy beets through golden mangoes to bright reds and fresh greens. Each new triangle should fit snugly against its neighbors with no visible gaps between them. The tessellation is what transforms this from a platter into a work of art. Don't leave any board showing; every space should be filled with color and pattern. As you work outward, occasionally step back and look at the whole board to ensure your color distribution feels balanced rather than clumpy.
- Integrating Crackers and Delicate Accents:
- Once your main tessellation is complete, trim your crackers or lavash sheets into the same triangle shape and nestle them into strategic spots, maintaining the interlocking pattern. These add textural interest and give guests something to actually pick up and eat. Now comes the final artistry: sprinkle your microgreens and pomegranate arils directly into the crevices between triangles. They should look naturally nestled, not scattered. If using fig jam or honey, apply it with a small spoon in delicate dots rather than drizzles—this maintains your geometric aesthetic.
- The Final Flourish:
- A light sprinkle of flaky sea salt and freshly cracked black pepper across the entire board brings all the flavors into focus. The salt should be distributed evenly but sparingly—you're seasoning, not covering. Step back and examine your work. The board should look like a vibrant, edible mosaic with no visible gaps, vibrant color variation, and an almost hypnotic pattern. If you see empty board peeking through, fill it. This is your moment to adjust anything that feels off balance.
 Save
Save My moment of truth came when my 8-year-old nephew looked at the tessellation board and said, 'This is too pretty to eat,' before asking if I was a real artist. I realized that food becomes so much more than sustenance when we take time to present it with intention and care. That's when this recipe stopped being about impressing people and started being about creating memories.
The Art of Geometric Precision
The tessellation technique transforms how you think about food presentation. What makes this different from a regular charcuterie board is the commitment to uniformity and interlocking. When every piece is the same size and shape, the brain registers it as intentional and beautiful. This principle applies to any platter you create—whether it's desserts, tapas, or even a Sunday charcuterie for yourself. The geometry forces you to think about color blocking and rhythm in ways that scattered, random arrangements never could. I've started using this triangle technique for everything from arranging chocolate squares on a dessert board to organizing a vegetable platter for a picnic. Once you see how powerful consistent shapes are, you can't unsee it.
Ingredient Substitutions Without Losing the Magic
The beauty of the tessellation triangle is that it works with whatever you have on hand, as long as you maintain the commitment to shape and pattern. Swap Manchego for aged Gouda if that's what your market offers. Replace mango with fresh pineapple, which actually holds even cleaner edges. I've made versions with roasted purple sweet potato instead of beet, with thin slices of prosciutto creating salty accents, with fresh figs in summer and persimmons in fall. The technique remains the same; only the flavors change. What matters is that each ingredient is uniform, cool, and sliced with intention. The moment you stop thinking of this as a rigid recipe and start seeing it as a framework for creativity, you'll make it your own.
Plating Wisdom from the Kitchen
This recipe taught me that presentation is a skill like any other—it improves with practice and intentionality. The first time I made a tessellation board, it took 90 minutes and still had gaps. Now I can complete one in under an hour because my hands know what precision looks like. The key is never rushing the geometric cuts. Speed comes from muscle memory, not from hurrying through the process. Additionally, I've learned that the best appetizer platters work because they balance multiple sensory experiences: the visual geometry, the textural variety from crispy crackers to soft cheese to juicy fruit, the flavor complexity from savory to sweet, and the tactile pleasure of being able to pick up perfectly portioned triangles. When you understand that appetite begins with the eyes, you understand why this platter works so well.
- Always chill your cutting board in the freezer for 15 minutes before slicing soft ingredients like cheese and avocado—the cold surface keeps them firmer and the cuts cleaner
- Use a metal ruler as your guide, not just for measurement but to protect your knife blade from accidental nicks against the cutting board
- Assemble the platter on the actual serving board you'll use rather than transferring it afterward—moving a tessellation risks disrupting the pattern
 Save
Save This tessellation triangle reminds me that food is one of the few things we create that engages all five senses simultaneously, and when you honor that fact by taking time with presentation, you're not being pretentious—you're being generous. Every perfectly cut triangle is an invitation to slow down and actually taste something.
Recipe FAQs
- → How do I achieve perfect triangle shapes?
Use a sharp knife and a metal ruler or a triangle-shaped cookie cutter to slice ingredients into consistent 5 cm equilateral triangles. Work slowly and keep items chilled to maintain firmness.
- → What cheeses work best for this dish?
Aged Manchego, sharp white cheddar, and creamy Havarti provide varied textures and flavors that complement the geometric presentation.
- → Can I substitute the fruits and vegetables?
Yes, try kiwi, pineapple, zucchini, or roasted sweet potato for different colors and tastes while maintaining the triangular cuts.
- → How should I arrange the pieces on the platter?
Start at one corner, tightly interlocking each triangle with neighbors to create a seamless mosaic. Alternate colors and textures for striking contrast.
- → What accents can enhance the presentation and flavor?
Add gluten-free crackers trimmed into triangles, fresh microgreens, and pomegranate arils nestled into gaps. Drizzle honey or fig jam lightly and finish with flaky sea salt and black pepper.
- → How can I store leftovers safely?
Cover tightly and refrigerate for up to 2 hours. Avoid freezing and discard any leftovers left at room temperature longer than 2 hours.