 Save
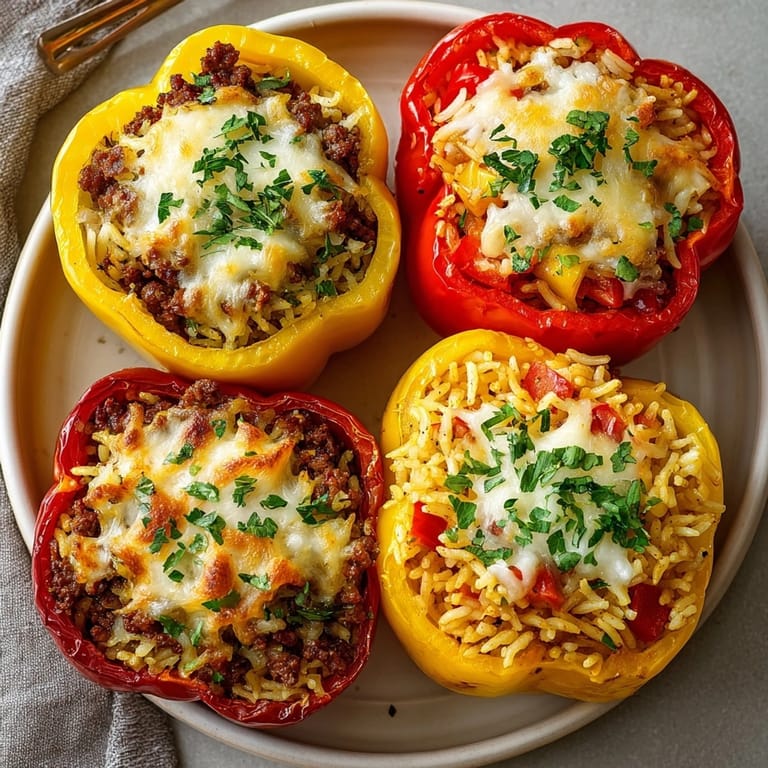
Save This hearty beef and rice stuffed peppers recipe transforms ordinary bell peppers into edible vessels filled with savory goodness. The combination of seasoned ground beef, fluffy rice, and melted cheese creates a complete meal that's both satisfying and impressive enough for company.
I first made these stuffed peppers for my family during a particularly busy week when I needed something that could be prepped ahead and popped in the oven at dinnertime. The colorful presentation and rich flavors were such a hit that they've become part of our regular dinner rotation ever since.
Ingredients
- 4 large bell peppers: any color for a vibrant presentation and natural sweetness when roasted
- 1 small onion: finely chopped adds essential aromatic flavor to the filling
- 2 cloves garlic: minced for that unmistakable depth of flavor choose fresh over pre minced for best results
- 1 lb ground beef: 85% lean provides the perfect balance of flavor and juiciness without excess grease
- 1 cup cooked long grain white rice: about 1/3 cup uncooked gives the filling substance and helps absorb the savory juices
- 1 can diced tomatoes: drained adds moisture and bright acidity look for fire roasted for extra flavor
- 1/2 cup tomato sauce: creates a cohesive filling that holds together beautifully
- 1 cup shredded mozzarella or cheddar cheese: divided between filling and topping for ultimate gooey goodness
- 1 tsp dried oregano: classic Mediterranean herb that pairs perfectly with beef and tomatoes
- 1 tsp dried basil: adds sweet aromatic notes that complement the tomatoes
- 1/2 tsp paprika: adds subtle smoky notes and beautiful color
- 1/2 tsp salt: enhances all the flavors use kosher salt for best results
- 1/4 tsp ground black pepper: adds necessary warmth and depth
- 2 tbsp olive oil: for sautéing use extra virgin for better flavor
- Fresh parsley: chopped for garnish adds bright color and fresh flavor contrast
Tired of Takeout? 🥡
Get 10 meals you can make faster than delivery arrives. Seriously.
One email. No spam. Unsubscribe anytime.
Instructions
- Prepare the Peppers:
- Preheat your oven to 375°F and prepare your peppers by carefully slicing off the tops to create little edible bowls. Remove all seeds and white membrane from inside using your fingers or a spoon. This creates maximum space for the filling and removes any bitter elements. Rub the outsides lightly with olive oil to prevent drying during baking and set them aside while you make the filling.
- Create the Aromatic Base:
- Heat 2 tablespoons of olive oil in a large skillet over medium heat until it shimmers but doesn't smoke. Add your finely chopped onion and cook for 2 to 3 minutes until they become translucent and slightly golden at the edges. This process releases their natural sweetness. Add the minced garlic and cook for just 30 seconds more until fragrant being careful not to let it brown or it will become bitter.
- Brown the Beef:
- Add the ground beef to the skillet breaking it up with a wooden spoon into small crumbles. Cook thoroughly for about 5 to 6 minutes until no pink remains stirring occasionally. The meat should develop a nice brown color which indicates flavor development through the Maillard reaction. If there's excess fat drain it off to keep your filling from becoming greasy.
- Combine the Filling:
- To the cooked beef add your drained diced tomatoes cooked rice half cup of shredded cheese tomato sauce and all the seasonings oregano basil paprika salt and pepper. Stir everything together and let it cook for 2 to 3 minutes allowing the flavors to meld and the cheese to begin melting into the mixture. The filling should be moist but not soupy.
- Stuff and Prepare for Baking:
- Arrange your oiled peppers standing upright in a baking dish. If they wobble trim a tiny slice from the bottom to create a flat surface without cutting through to the hollow center. Carefully spoon the beef and rice mixture into each pepper packing it in gently but firmly. Top each stuffed pepper with the remaining cheese dividing it equally for that perfect golden crust.
- Bake to Perfection:
- Pour 1/4 cup water into the bottom of the baking dish this creates steam that helps cook the peppers evenly and prevents the bottom from scorching. Cover the dish loosely with foil to trap moisture and bake for 30 minutes. Then remove the foil and continue baking for 10 to 15 minutes more until the peppers are tender when pierced with a fork and the cheese on top is bubbling and golden brown.
 Save
Save Stuffed peppers are one of those dishes that always remind me of my grandmother's kitchen. She would let me help stuff the peppers when I was just tall enough to reach the counter. The secret ingredient she always insisted on was taking the time to really brown the beef well before adding the other ingredients. That extra step develops a depth of flavor that makes all the difference in the final dish.
Make-Ahead Options
These stuffed peppers are perfect for busy weeknights because you can prepare them entirely up to the baking stage and refrigerate for up to 24 hours. When ready to serve simply add about 10 minutes to the covered baking time to account for the chilled ingredients. The flavors actually develop and improve when the filling has time to rest which makes this an ideal prepare ahead meal. If you're really planning ahead you can even freeze the stuffed peppers before baking wrap them individually in plastic wrap then foil and freeze for up to 3 months.
Vegetarian Adaptation
Turning this recipe vegetarian is surprisingly simple and equally delicious. Replace the ground beef with a 15oz can of drained black beans or 2 cups of finely chopped mushrooms sautéed until they release their moisture. For added protein and texture consider adding 1/2 cup of cooked lentils or 1/4 cup of chopped walnuts to the filling mixture. The cooking process remains the same though vegetable versions may need slightly less baking time about 5 minutes less since there's no meat that needs to be thoroughly cooked.
Serving Suggestions
These colorful stuffed peppers make a complete meal on their own but they pair beautifully with simple sides that complement without overwhelming. A crisp green salad dressed with lemon vinaigrette offers a refreshing contrast to the rich filling. For heartier appetites serve alongside crusty garlic bread to soak up any extra sauce. If you're hosting a dinner party consider serving these as the main course with a Mediterranean antipasto platter as a starter featuring olives marinated vegetables and cheeses to set the tone for the meal.
Customization Ideas
The basic recipe is wonderfully adaptable to suit different tastes and dietary needs
Try different cheese varieties like pepper jack for heat or feta for a Mediterranean twist
Add chopped spinach or kale to the filling for extra nutrition and color
Troubleshooting Tips
If your peppers won't stand upright in the baking dish create a supportive base using crumpled foil around them. This prevents them from tipping and spilling their filling during baking. For peppers that are still quite firm after baking cover them again with foil and bake for an additional 5 to 10 minutes. The perfect texture should be tender but not collapsed. If the tops are browning too quickly before the peppers are done simply place a loose piece of foil over just the top surface to prevent burning.
 Save
Save Enjoy your delicious and impressive homemade stuffed peppers!
Recipe FAQs
- → Can I use different meats for stuffing?
Yes, you can substitute ground turkey or chicken for beef. Each offers a lighter flavor and texture.
- → Should the rice be cooked beforehand?
Cook the rice first before adding it to the filling to ensure a fluffy, cohesive texture inside the peppers.
- → How do I keep peppers from getting soggy?
Lightly rub peppers with oil and do not overbake. Adding water to the baking dish also prevents scorching.
- → What cheese works best for topping?
Mozzarella and cheddar are common choices, but any melty cheese like Monterey Jack will work well.
- → How do I store and reheat leftovers?
Store cooled stuffed peppers in an airtight container in the fridge for up to three days. Reheat in the oven or microwave.
- → Are these suitable for gluten-free diets?
Yes, using plain rice and checking labels on canned ingredients ensures the dish is naturally gluten-free.