 Save
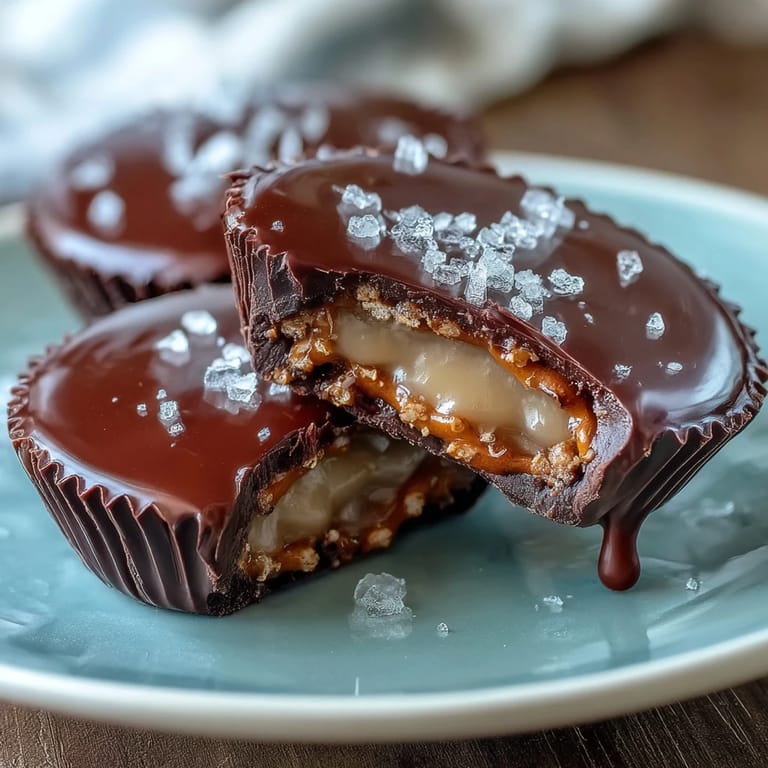
Save My neighbor brought over a box of homemade peanut butter cups last winter, and I watched her crack into one with such obvious pride that I had to ask for the recipe immediately. She grinned and admitted she'd been experimenting with adding pretzels to the mix for months—turns out that salty crunch was exactly what the classic candy had been missing all along. When she described how the pretzel base stayed crispy even after chilling, I was sold. That afternoon, I cleared my kitchen counter and started crushing pretzels, already imagining the moment someone would bite into one of these and experience that perfect sweet-salty contrast.
I made my first batch on a lazy Sunday while my partner was working in the next room, and the smell of melted chocolate drifting through the house eventually drew him over with just the right amount of curiosity. He watched me carefully layer the peanut butter onto those pretzel bases and asked why I wasn't just buying them from the store like a normal person. By the time they came out of the fridge, he'd already claimed three, and I realized these little cups had somehow become our thing without any planning involved.
Ingredients
- Mini salted pretzels (1 cup, about 60 g), crushed: The foundation of everything here—buy ones you actually like eating because they're the backbone of the crunch, and don't pulverize them into dust or you'll lose that satisfying texture.
- Unsalted butter for the base (2 tbsp, melted): This is what holds the pretzel pieces together, so don't skip it thinking the pretzels are salty enough already.
- Creamy peanut butter (3/4 cup, 180 g): Use something you'd actually spread on toast—the quality here matters because this layer is the star of the show.
- Powdered sugar (1/4 cup, 30 g): A light touch of sweetness that prevents the filling from being one-note peanut.
- Vanilla extract (1/4 tsp): Just enough to round out the peanut butter's flavor without announcing itself.
- Salt (pinch): This seems redundant but it actually brightens everything and plays beautifully with the chocolate later.
- Semi-sweet chocolate chips (1 1/4 cups, 210 g): The final layer that ties everything together—choose ones you'd snack on straight from the bag.
- Coconut oil or unsalted butter (1 tbsp) for the chocolate: This keeps the chocolate smooth and glossy instead of thick, which makes spreading it so much easier.
Tired of Takeout? 🥡
Get 10 meals you can make faster than delivery arrives. Seriously.
One email. No spam. Unsubscribe anytime.
Instructions
- Line your cups and prep the oven:
- Set up a 12-cup muffin tin with paper liners, making sure they sit flat and stable because you'll be pressing things into them with some gentle force.
- Build the pretzel base:
- Crush your pretzels until you have some texture variation—you want bits and pieces, not powder—then toss them with melted butter until every piece glistens. Press about 1 tablespoon firmly into each liner, creating an even, compact layer that will support the filling above it.
- Spread the peanut butter layer:
- Whisk together peanut butter, powdered sugar, vanilla, and that tiny pinch of salt until completely smooth, then dollop about 1 tablespoon onto each pretzel base. Use the back of your spoon to gently smooth it out, being careful not to disturb the pretzel layer underneath.
- Melt your chocolate carefully:
- Place chocolate chips and coconut oil in a microwave-safe bowl and heat in 30-second bursts, stirring between each interval until you have glossy, smooth chocolate with no lumps. This careful approach prevents burned chocolate, which tastes bitter and ruins the whole vibe.
- Top with chocolate:
- Spoon the melted chocolate over each cup, then use the back of the spoon to smooth it into an even layer that seals everything inside. Work while the chocolate is still warm enough to spread easily but cool enough that it doesn't melt the peanut butter layer.
- Chill until set:
- Slide your tin into the refrigerator for at least 30 minutes—this is when the magic happens and everything firms up into distinct, satisfying layers.
- Store and enjoy:
- Once set, pop the cups out of their liners and keep them in an airtight container in the fridge, where they'll stay fresh and crispy for days.
 Save
Save There's something deeply satisfying about making candy in your own kitchen, especially when a friend texts asking if you have any to spare and you can actually say yes. These cups have a way of turning ordinary afternoons into moments that feel intentional and generous, even though all you really did was layer three things and wait for them to set.
Playing with Crunch and Texture
The moment I realized these cups actually work comes down to texture contrast—the hard snap of pretzel against creamy peanut butter against smooth chocolate creates something that feels more interesting in your mouth than any single-texture candy could. If your pretzel base is coming out soft, you're either not pressing it down firmly enough or your pretzels aren't truly crispy to begin with. A quick taste test of your pretzels before you start is honestly the smartest thing you can do.
Flavor Balance and Customization
These cups work because nothing is trying too hard—the salt in the pretzels doesn't shout, the sweetness of the peanut butter and sugar is gentle, and the chocolate arrives as a quiet closer. But this also means you can adjust based on what you're feeling: prefer more salt, use salted pretzels and skip the salt in the filling; want deeper chocolate flavor, swap in dark chocolate chips; need more sweetness, use milk chocolate instead. I've made them all three ways, and honestly, every version tastes like a deliberate choice rather than a mistake.
Secrets and Shortcuts That Actually Work
One discovery that changed my game was adding a few crushed pretzels right on top of the melted chocolate before it sets—it looks beautiful and gives you another layer of crunch in each bite. The other small thing that matters is keeping your chocolate bowl warm while you work, so you can spread it smoothly without it setting up too quickly on you. These aren't advanced techniques, just little observational wins you'll collect as you make your first batch.
- For extra crunch, sprinkle a few crushed pretzels on top of the chocolate layer while it's still wet so they stick.
- If you want richer flavor, substitute half the semi-sweet chips with dark chocolate for a more sophisticated bite.
- Make a double batch because these disappear faster than you'd think, and having extras stashed in the fridge means you're always ready to share.
 Save
Save These homemade peanut butter cups represent something small but real: the satisfaction of making something people actually want to eat, better than what you'd buy. Once you've made them once, you'll find yourself making them again.
Recipe FAQs
- → What type of pretzels work best for the base?
Mini salted pretzels crushed finely create the perfect crunchy base, providing a balanced salty flavor.
- → Can I substitute the peanut butter filling?
Yes, creamy nut butters like almond or cashew can be used for a different flavor profile.
- → What chocolate varieties can be used for the topping?
Semi-sweet, dark, or milk chocolate chips melt smoothly to coat the filling, each adding unique sweetness or bitterness.
- → How long should the cups be chilled?
Chill for at least 30 minutes to allow the layers to set firmly before serving.
- → Are there gluten-free options available?
Using gluten-free pretzels ensures this treat can be prepared gluten-free without sacrificing crunch.