 Save
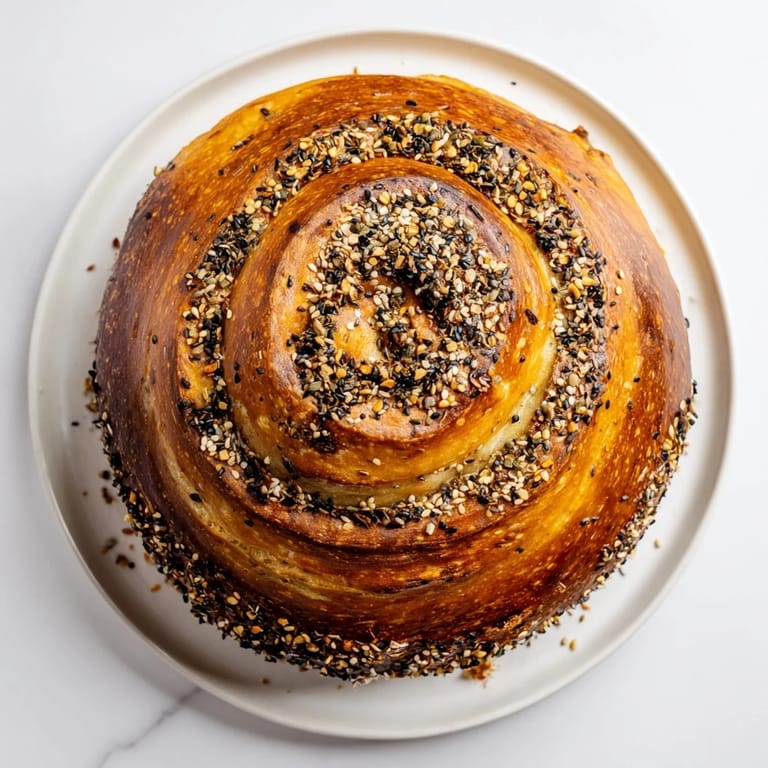
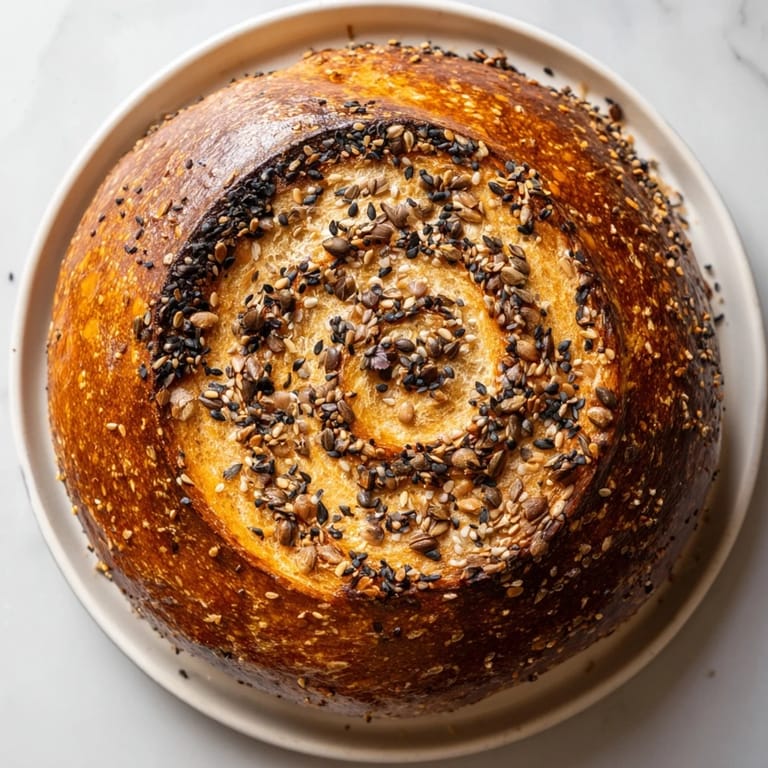
Save I still remember the first time I saw a Fibonacci spiral in nature—a seashell at the beach, then later a pinecone in my kitchen window. There was something magical about that pattern, something that made me want to capture it in bread. One quiet Sunday morning, I decided to turn mathematics into dough, and after hours of folding, shaping, and coiling, I pulled from the oven this stunning spiral loaf that looked almost too beautiful to eat. Almost. The moment I sliced into it and saw those concentric rings of increasing seed density, I knew I'd found something special—a loaf that feeds both the eye and the soul.
I'll never forget my sister's face when she saw the spiral for the first time. She's not easily impressed, but she actually gasped. We sat at the kitchen table with strong coffee, slicing slowly to admire each ring, and that bread became more than breakfast—it became a moment we actually talked about years later. That's when I realized this recipe wasn't just about technique; it was about creating memories.
Ingredients
- Bread flour (600 g): Use unbleached, high-protein flour—it gives you the structure and elasticity you need for a tall, open crumb. I learned the hard way that all-purpose flour just doesn't have the strength for this spiral architecture.
- Lukewarm water (400 ml): The temperature matters more than you'd think. Around 30°C (86°F) wakes up the yeast perfectly—too hot and you kill it, too cold and nothing happens. Use your inner wrist to test if you don't have a thermometer.
- Instant yeast (7 g): Don't skip the dissolving step. Mixing it with water first ensures even distribution and faster fermentation. It's one of those small steps that changes everything.
- Fine sea salt (10 g): Salt strengthens gluten and controls fermentation speed. Always whisk it into the dry flour first—direct contact with yeast can slow things down.
- Extra virgin olive oil (30 ml): This adds richness and keeps the crumb tender. It also makes handling the dough easier, especially when you're working with those eight segments.
- Sugar (10 g): Just a teaspoon to feed the yeast and balance the salt. It's subtle but crucial.
- Mixed seeds (125 g total): The heart of this recipe's visual magic. White sesame, black sesame, sunflower, pumpkin, and flaxseeds each create their own density layer as you spiral outward. Start with equal amounts and adjust based on how much you like each flavor.
- Egg wash (1 beaten egg): This gives you that professional golden-brown shine. It's the difference between a loaf that looks homemade and one that looks like it came from an artisan bakery.
Tired of Takeout? 🥡
Get 10 meals you can make faster than delivery arrives. Seriously.
One email. No spam. Unsubscribe anytime.
Instructions
- Mix Your Dough Foundation:
- Start by whisking your bread flour, salt, and sugar together in a large bowl. Take your time here—you're distributing salt evenly so one bite doesn't surprise you with saltiness. In another container, dissolve your yeast in that lukewarm water. It should smell alive and start foaming slightly within a minute. Make a well in the center of your dry ingredients and pour in the yeast mixture along with your olive oil. Using your hands or a dough scraper, start pulling the dry flour into the wet mixture until you have a shaggy, rough dough with no dry flour hiding at the bottom. Don't worry if it looks messy—it's supposed to.
- Knead Until It Sings:
- Turn your dough onto a lightly floured surface. Now comes the meditative part: push the dough away from you with the heel of your hand, fold it back toward you, give it a quarter turn, and repeat. For about 10 minutes, keep this rhythm going. You're building gluten, the invisible network that will hold your bread together. Around minute 8, the dough will start feeling smooth and elastic. When you stretch a small piece and can see light through it without it tearing—that's the windowpane test, and it means you're done. If it breaks easily, give it a few more minutes. And here's the secret: if the dough gets sticky, don't add more flour. Oil your hands instead. Extra flour will make your loaf dense and dry.
- Let It Rest and Rise:
- Shape your dough into a ball and place it in a lightly oiled bowl. Cover it loosely with plastic wrap or a damp kitchen towel. Find a warm, draft-free corner of your kitchen—around 24-27°C (75-80°F) is perfect. An oven with the light on works beautifully. After about an hour, your dough should have nearly doubled. Press it gently with your finger—if the indentation springs back slowly and doesn't disappear completely, you're ready to move forward.
- Prepare Your Seed Layers:
- While your dough rests, set up five small bowls, one for each seed type. This is where the magic of density gradients begins. As your spiral grows outward, each segment will get more seeds, creating layers of increasing texture and flavor. Think of it like building a flavor story from the inside out.
- Divide Into the Fibonacci Sequence:
- Once your dough has risen, give it a gentle press to release excess gas—not a punch, just a tender deflation. Now comes the mathematical part: use your kitchen scale to divide the dough into eight segments with these approximate weights: 20g, 20g, 40g, 60g, 100g, 160g, 260g, and 400g. Each segment builds on the last, creating that beautiful Fibonacci growth. Don't stress about being perfect—nature isn't, and neither is bread.
- Knead Seeds Into Each Segment:
- Take your smallest segment and gently work it into a rectangle. Sprinkle about 2 grams of your mixed seeds across it and knead gently until they're incorporated evenly. Roll it into a rope, sealing the seam. Move to the next segment and repeat, slightly increasing the seed amount each time until your largest segment gets about 20 grams of seeds. The idea is that as your rope gets bigger, it also gets denser and more textured. Avoid overworking the dough at this stage—you want tender bread, not tough bread.
- Coil Your Spiral:
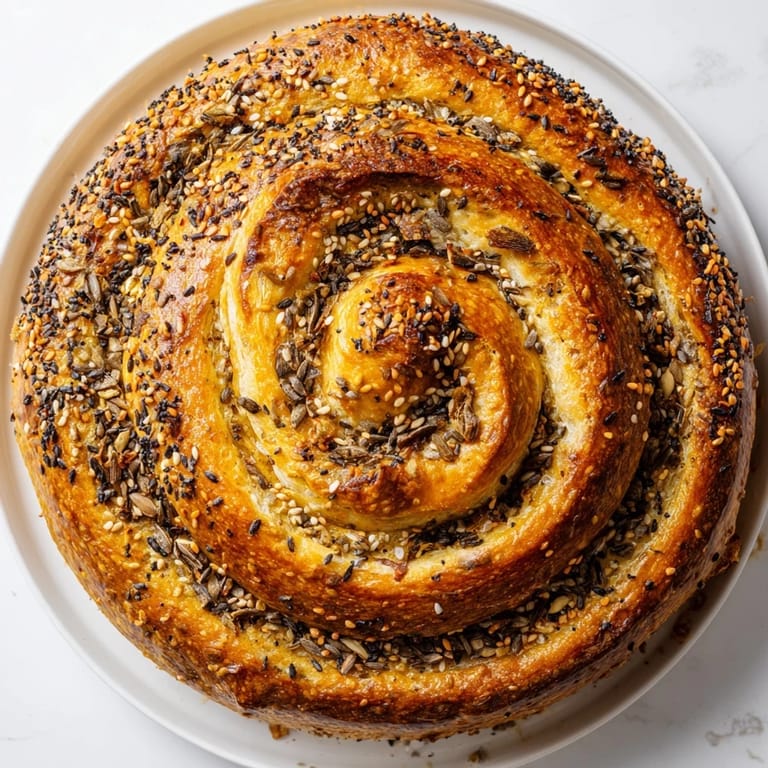
- Line a baking sheet with parchment paper. Take your smallest rope and coil it tightly into the center of your sheet, creating the spiral's heart. Now, take your second-smallest rope and wrap it around the first, pinching the end to secure it. Continue with each rope, wrapping around the previous coil and overlapping slightly to create a seamless, continuous spiral. As you add each rope, the spiral grows in width and thickness, just like nature intended. Step back and admire it—this is your artwork now.
- Second Rise, Gentle and Patient:
- Cover your spiral loosely with oiled plastic wrap or a proofing cloth. Let it rise again at room temperature for 45 to 60 minutes. You're looking for it to puff up noticeably and feel light when you gently touch it. This is the moment where timing matters: rise too little and your bread stays dense; rise too much and it collapses in the oven. Trust your senses, not just the clock.
- Prepare Your Oven Theater:
- At least 30 minutes before baking, preheat your oven to 220°C (425°F). Place a shallow pan of water at the bottom—this creates steam, which develops that crisp, golden crust that makes artisan bread so satisfying to bite into. Steam is the secret weapon most home bakers overlook.
- Final Glaze and Bake:
- Brush your spiral loaf all over with beaten egg, making sure to cover every surface for an even, glossy finish. Sprinkle your reserved mixed seeds on top, concentrating on the outer edges for visual drama. Slide it onto the middle rack and bake for 30 to 35 minutes. After 15 minutes, rotate the tray so the bread browns evenly. Watch for a deep golden-brown color and toasted seeds. To check doneness, tap the bottom of the loaf—a hollow sound means it's done. An instant-read thermometer reading 95°C (203°F) at the center confirms it. If the top browns too quickly, tent it loosely with foil for the final 10 minutes.
- Cool Before You Slice:
- Transfer your beautiful creation to a wire rack immediately. This is hard—the aroma will pull you toward the kitchen—but patience here is essential. Let it cool completely, at least an hour, before you slice. This prevents the crumb from being gummy and preserves those spiral lines you worked so hard to create. When you finally do slice it, the moment is worth the wait.
 Save
Save There's something profound about pulling a spiral loaf from the oven and having your entire kitchen smell like warm, toasted seeds and caramelized crust. My partner walked in during one of my early attempts and just stood there, silent, taking it in. That's when I realized this bread had crossed from being just a recipe into being an experience, something that made the day feel special just by existing.
The Fibonacci sequence isn't just visual poetry—it's also a flavor progression. As your spiral grows outward, you're layering increasing amounts of seeds, which means increasing amounts of nuttiness, texture, and richness. The innermost sections are delicate and gentle, while the outer ring is bold and seed-forward. When you slice the bread, each ring tells its own story. Some people focus on the mathematical beauty, but I've always been more drawn to the way it tastes—how one bite takes you from light and airy to complex and satisfying. That gradation is intentional, and it's one of the reasons this bread keeps people coming back.
The spiral shape is forgiving in its own way, even though it sounds complicated. Unlike a tight boule where every fold matters, the spiral allows for a more intuitive, flowing assembly. I think of it like drawing a spiral on paper—you can adjust as you go, and imperfection often adds character. The key is making sure each rope is sealed well where it joins to the next, so your spiral doesn't unravel in the oven. I've made spirals that were slightly off-center or where one rope was a bit thicker than planned, and honestly, they turned out just as beautiful. The uniqueness is part of the charm.
This recipe looks intimidating on paper, but it's really just advanced organization rather than advanced technique. You're not doing anything your hands haven't done before—mixing, kneading, shaping, baking. You're just doing it in a specific, mathematical sequence. The first time you make it, give yourself grace. The second time, you'll be faster. By the third time, you'll stop following the recipe and start trusting your instincts, and that's when the magic really happens.
- Use a digital scale—guessing weights will frustrate you, and the Fibonacci sequence deserves precision
- Don't skip the steam in your oven; it's the difference between a chewy crust and a crackly one
- Keep your spiral covered while it rises so the surface doesn't dry out and crack
 Save
Save Every time I make this bread, I'm struck by how something so mathematical can feel so alive, so organic. That's the real beauty of the Fibonacci spiral—it's proof that nature and math aren't opposites, they're the same language spoken two different ways. Make this bread, and you'll understand.
Recipe FAQs
- → How does the Fibonacci sequence influence shaping the loaf?
The dough is divided into eight segments whose weights follow the Fibonacci numbers, creating progressively larger portions. Shaped into ropes and coiled, these segments form a spiral that visually and texturally reflects this natural pattern.
- → What role do the mixed seeds play in this bread?
Seeds are incorporated in increasing amounts into each dough segment, producing layers of varying density that enhance texture and flavor throughout the spiral.
- → How can I ensure a soft, elastic dough for this artisan bread?
Proper kneading develops gluten which gives the dough strength and elasticity. The dough should be tacky but not sticky, with a windowpane test confirming it's ready.
- → Why is the egg wash applied before baking?
Brushing the loaf with beaten egg helps develop a glossy, golden crust and seals in moisture while baking for appealing appearance and texture.
- → What precautions should be taken during proofing and baking?
Avoid over-proofing which can cause collapse in the oven. Bake at 220°C with steam for crust development, and rotate the tray midway to ensure even browning.
- → Can I substitute some ingredients for variation?
Yes, try partial whole wheat flour for nuttier flavor or experiment with different seeds or nuts to customize texture and taste.