 Save
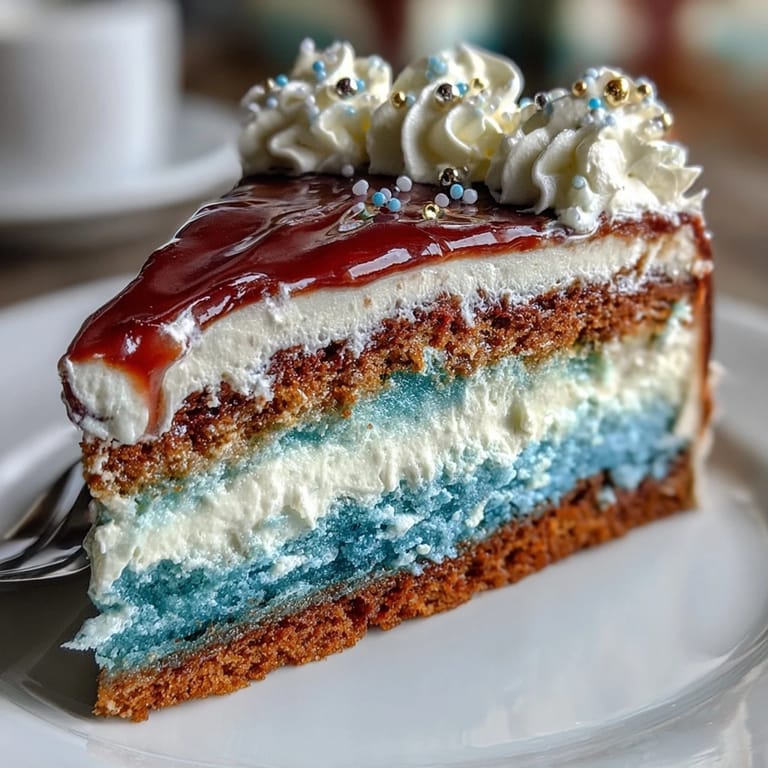
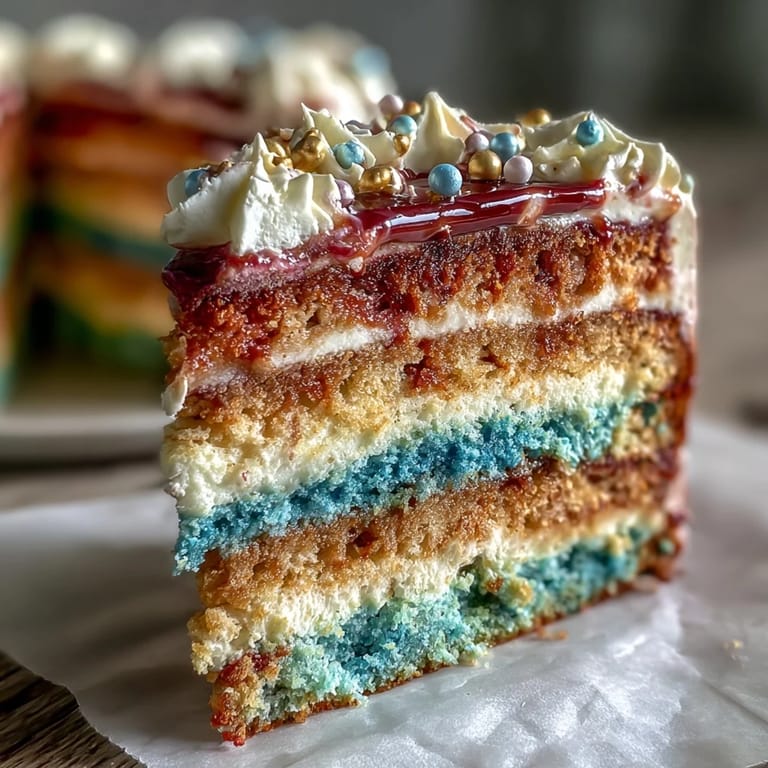
Save My hands were shaking a little when I pulled this cake out of the oven on my daughter's graduation morning. She'd mentioned wanting something stunning but not traditional, and somewhere between her excitement and my own desire to mark the moment, this ombre cake became the plan. The colors shifted so beautifully from dark to light that it felt like we were capturing something about transition itself, about moving from one chapter into the next.
What I didn't expect was how the kitchen became command central that morning. My son was testing the buttercream consistency, my mom was arranging edible pearls in little dishes, and there was this quiet kind of joy happening while we worked together, each layer cooling on racks lined up like a timeline. By the time we stacked those four tinted layers, everyone in the kitchen went silent for a second because it actually looked like we'd pulled something magical off.
Ingredients
- All-purpose flour (3 1/4 cups): The foundation that keeps these layers tender and structurally sound; measuring by weight eliminates guesswork.
- Baking powder (2 1/2 tsp): Your lift and rise, but don't skip the salt that balances sweetness and makes every flavor sing.
- Unsalted butter (1 cup) and granulated sugar (2 cups): The creaming of these two is where magic starts, creating an emulsion that traps air and gives you that feathery crumb.
- Room temperature eggs (4 large) and vanilla extract (1 tbsp): Cold eggs won't incorporate smoothly, and vanilla adds depth that pure sweetness can never achieve alone.
- Whole milk (1 1/4 cups) at room temperature: The temperature matters because it keeps your batter balanced and helps the flour hydrate evenly.
- Gel food coloring: Gel won't dilute your batter the way liquid coloring does, keeping that crumb structure tight and giving you true, vibrant hues.
- Egg whites (6 large) and granulated sugar (1 1/2 cups) for buttercream: Swiss meringue creates a stable, luxurious frosting that won't separate or weep even at room temperature.
- Unsalted butter cubes (1 1/2 cups) and vanilla extract (2 tsp): The cubes add gradually so the mixture stays emulsified; room temperature butter is non-negotiable.
- Optional decorations (edible pearls, toppers): These are your punctuation marks, the little details that transform a beautiful cake into something unforgettable.
Tired of Takeout? 🥡
Get 10 meals you can make faster than delivery arrives. Seriously.
One email. No spam. Unsubscribe anytime.
Instructions
- Set up your stations:
- Preheat your oven to 350°F and prep four 8-inch pans with parchment, letting the oven get completely to temperature so every layer bakes evenly. Having everything ready before you start mixing means you're not rushing or second-guessing yourself.
- Build the dry base:
- Whisk flour, baking powder, and salt together in a medium bowl, breaking up any little clumps so the batter rises evenly. This is the moment to pay attention because these three ingredients do all the heavy lifting structurally.
- Cream butter and sugar into clouds:
- Beat unsalted butter and sugar together until the mixture is pale, fluffy, and takes up noticeably more space in the bowl, which takes about 3 to 4 minutes. This aeration is what gives you that tender crumb.
- Add eggs slowly and deliberately:
- Crack each room temperature egg in one at a time, beating well after each addition so each one emulsifies fully before you add the next. If you rush this step, your batter can look grainy or broken.
- Fold in vanilla and the flour mixture:
- Mix in vanilla extract, then alternate adding the flour mixture and milk, starting and ending with flour and mixing only until combined. Overmixing develops gluten, which toughens cake, so stop as soon as you see no streaks.
- Divide and tint with intention:
- Pour batter evenly into four bowls, then add increasing amounts of gel food coloring to each, creating a gradient from lightest to darkest. Stir gently until the color is even.
- Fill pans and smooth the tops:
- Pour each colored batter into its prepared pan and run an offset spatula across the top so they bake evenly. The darkest layer goes in one pan, the lightest in another, and you'll stack them in order later.
- Bake until just set:
- Watch for 22 to 25 minutes, testing with a toothpick in the center; when it comes out clean or with a single moist crumb, they're done. Don't overbake or the layers will be dry.
- Cool with patience:
- Let layers rest in pans for 10 minutes so they firm up enough to handle, then turn them out onto wire racks to cool completely. Frosting warm cake is how you end up with a melted mess.
- Make the Swiss meringue buttercream:
- Set a heatproof bowl over barely simmering water and whisk egg whites with sugar constantly until it reaches 160°F and feels completely smooth when you rub a bit between your fingers. Don't let it get too hot or you'll cook the eggs unevenly.
- Whip until cool and glossy:
- Transfer the mixture to a stand mixer and whip on high speed for about 10 minutes until stiff peaks form and the bowl feels cool to the touch. This is where the magic of meringue happens, all those little air bubbles creating volume.
- Add butter gradually and with confidence:
- Add softened butter a few cubes at a time, beating well between additions; if the mixture looks grainy or separated at first, keep beating and it will come together into silk. Rushing this or using cold butter will break your emulsion.
- Finish with vanilla and color:
- Mix in vanilla extract and tint portions of the buttercream with gel coloring if you want ombre piping or gradients. You can tint the whole batch one color or keep portions separate for layering effects.
- Trim and stack with care:
- If any layers domed during baking, use a serrated knife to level them gently, then place the darkest layer on your cake stand. Spread a generous dollop of buttercream on top, then repeat with each successive layer, ending with the lightest.
- Apply the crumb coat:
- Cover the entire stacked cake with a thin layer of buttercream to seal in crumbs, then chill for 20 minutes so the final frosting goes on clean. This step looks tedious but saves you from little cake fragments in your beautiful finish.
- Frost and blend your ombre:
- Apply the final layer of buttercream in larger swoops and swirls, blending colors if you've tinted them, or keeping it solid if you prefer simplicity. Offset spatulas work best for smooth, modern looks; piping bags work for texture and dimension.
- Decorate with intention:
- Add edible pearls, a graduation cap topper, or piped details while the frosting is still slightly soft so everything adheres beautifully. Step back and let yourself be proud of what you've created.
- Chill and bring to temperature:
- Refrigerate the finished cake until the frosting is completely set, then remove it 30 minutes before serving so the cake is cool but the frosting isn't too stiff. The flavor and texture come alive at that perfect cool room temperature.
 Save
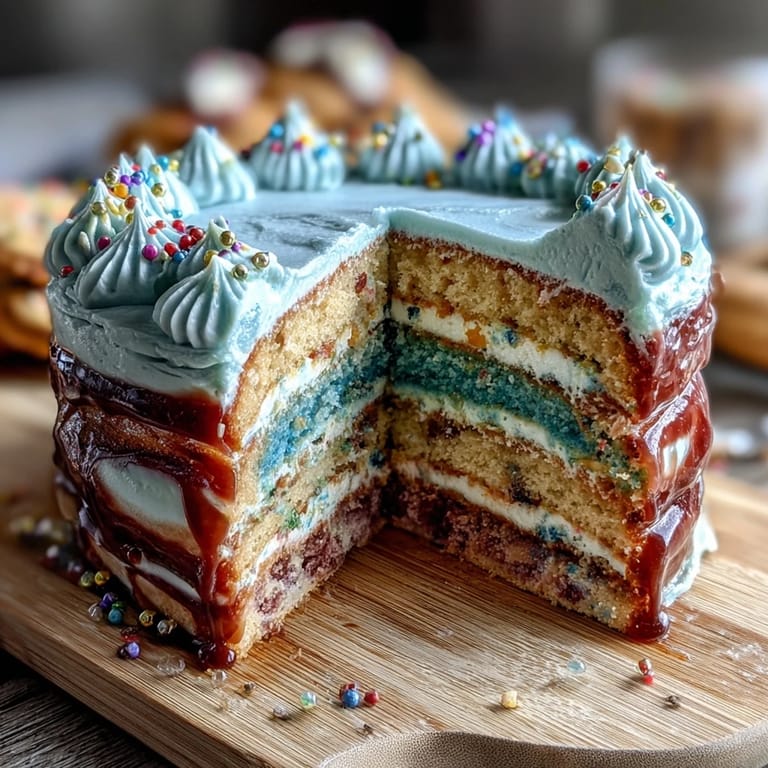
Save When my daughter cut into that cake at her graduation dinner, watching the four layers in their perfect ombre reveal themselves made everyone around the table take a breath. Food has this quiet way of holding moments, and in that slice we'd captured something real about her transition, about color and time and the sweetness of moving forward together.
Why Ombre Works for Big Moments
An ombre cake reads as intentional and beautiful without requiring you to master intricate piping or fondant work. The color gradient does most of the visual storytelling, making it feel celebratory and personal no matter what colors you choose. I've learned that the simplest designs often hit harder than fussy ones because they let the cake itself be the art.
The Swiss Meringue Difference
Unlike American buttercream made with just butter and powdered sugar, Swiss meringue starts with egg whites heated to a safe temperature, then whipped into a cloud. This method creates a frosting that's stable, doesn't taste overly sweet, and can sit at room temperature without sweating or separating. I stopped using other frostings for special occasion cakes once I understood how much better this one holds up, especially when you're transporting or setting it out for hours.
Timing and Composition Tips
The beauty of this cake is that you can bake all four layers the day before, wrap them tightly, and make your buttercream the morning of serving. That takes pressure off the day itself and gives you time to think about how you want to layer and decorate. Here's what I've learned the hard way about pulling this off smoothly.
- Bake layers a full day ahead, wrap individually in plastic wrap, and they'll stay fresh and moist while you focus on frosting.
- Make Swiss meringue buttercream up to 3 days ahead and refrigerate it in an airtight container, then bring it to room temperature and re-beat it briefly before using.
- If you're adding pearls or toppers, wait until shortly before serving so they don't sink into soft frosting or lose their luster.
 Save
Save This cake has become my go-to for anyone marking a milestone because it tastes as good as it looks and doesn't require you to be a professional baker to pull it off. There's something powerful about feeding people something you made with intention, especially on a day that matters.
Recipe FAQs
- → How is the ombre effect achieved?
The batter is divided into four parts and tinted with increasing amounts of gel food coloring, creating a gradient from dark to light shades.
- → What makes the buttercream smooth and silky?
Swiss meringue buttercream is made by gently heating egg whites and sugar, then whipping until stiff peaks form before adding softened butter, ensuring a creamy texture.
- → Can this cake be made in advance?
Yes, the layers and buttercream can be prepared ahead and assembled later. Chilling the crumb coat helps set the layers before final frosting.
- → What tools are recommended for decorating?
Use piping bags with decorative tips, offset spatulas for smooth frosting, and edible embellishments like pearls and toppers for festive presentation.
- → Are there any allergen considerations?
This cake contains eggs, milk, wheat (gluten), and butter. Always check coloring and decoration labels for additional allergens.