 Save
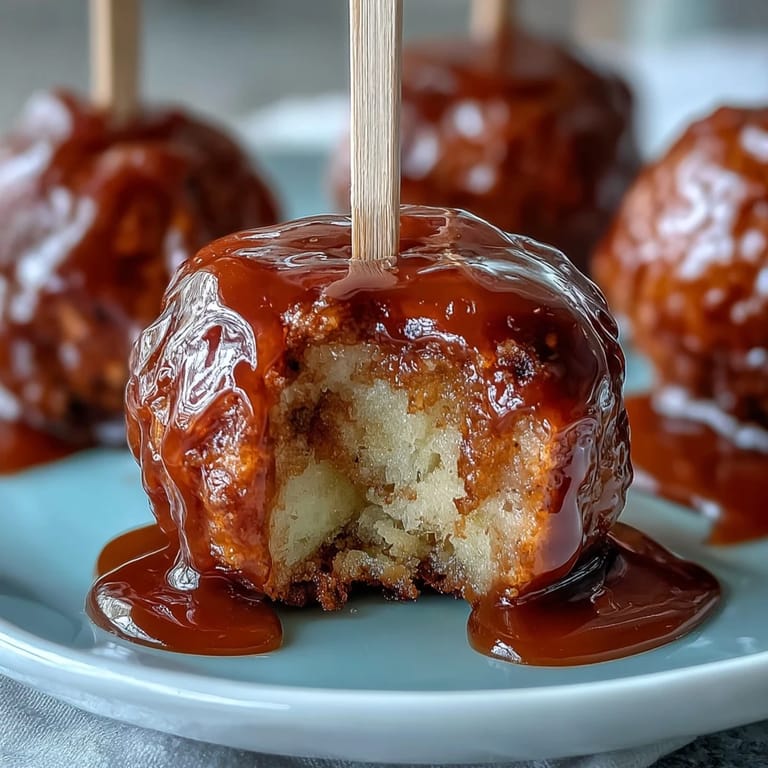
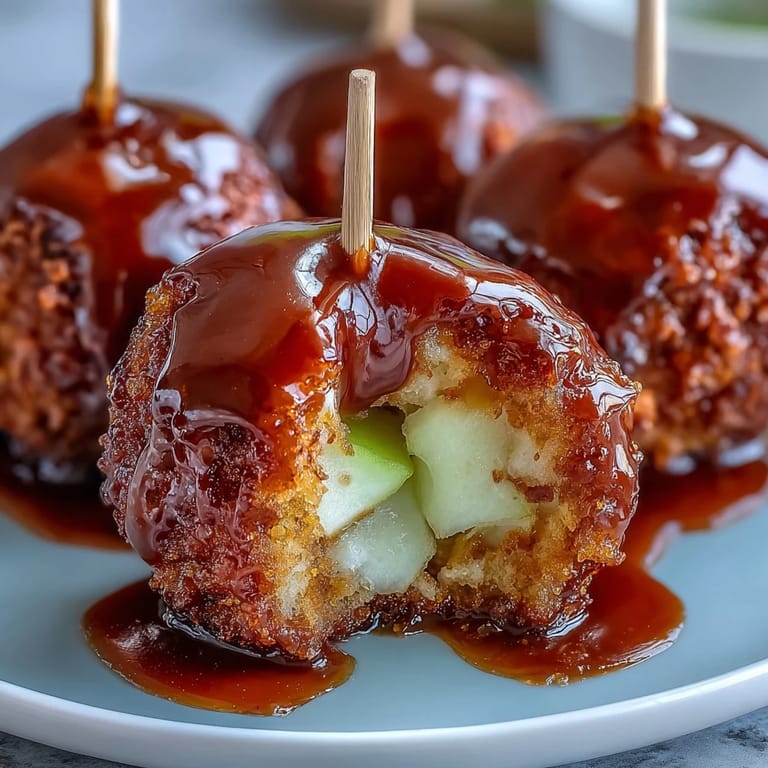
Save My neighbor knocked on the door one Saturday afternoon with a plate of these glossy red apple bites, and I couldn't stop eating them straight from her hand like some kind of candy-obsessed kid. She explained how she'd been making them for her daughter's school fundraiser, and within minutes I was asking for the recipe, already imagining them at my next gathering. There's something about that combination of tart apple and brittle-sweet candy coating that just works, especially when it's small enough to pop in your mouth without commitment. I've made them countless times since, and they never fail to disappear faster than anything else on the table.
I made these for a potluck where someone had explicitly banned store-bought desserts, and watching people's faces when they bit into one was absolutely worth the setup. One woman asked if I'd hired a professional pastry chef, and I just smiled and let her believe whatever made her happy. My kid's friend asked for the recipe to make them for his mom, which might be the highest compliment I've ever received in my kitchen. It's those small moments that remind me why I love sharing food with people.
Ingredients
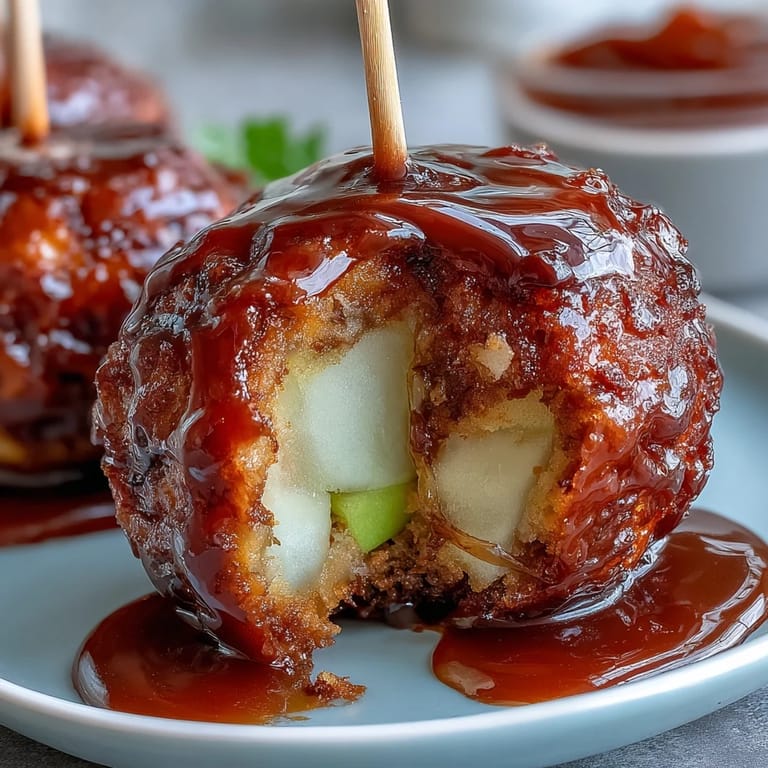
- 2 large crisp apples (Granny Smith or Fuji): The tartness cuts through the sweetness and keeps these from tasting like pure candy, plus firm apples hold their shape better when you're dunking them.
- 1 cup granulated sugar: This is the backbone of your candy coating, and it needs to be pure white granulated, not powdered or anything else.
- 1/3 cup light corn syrup: This prevents crystallization and gives you that beautiful glossy finish that looks almost professional.
- 1/4 cup water: Keep it measured precisely because too much and your candy won't set, too little and it burns.
- 1/4 teaspoon red food coloring: Add this after you hit temperature so the heat doesn't fade the color, and gel food coloring gives richer color than liquid.
- Nonstick cooking spray: A light mist on parchment stops the finished candies from sticking and makes cleanup effortless.
- Optional toppings: Chopped nuts, mini chocolate chips, or sprinkles go on while the coating is still wet, so have them ready before you start dipping.
Tired of Takeout? 🥡
Get 10 meals you can make faster than delivery arrives. Seriously.
One email. No spam. Unsubscribe anytime.
Instructions
- Set up your station:
- Line a tray with parchment paper and give it a light spray of nonstick cooking spray, then gather your toothpicks nearby because once the candy is ready, you're moving fast.
- Prepare the apples:
- Wash and thoroughly dry your apples because any moisture will cause the candy to slide right off. Core them, cut into roughly 1-inch chunks, and insert a toothpick into each piece, standing them upright on a plate.
- Combine your candy base:
- In a small saucepan, stir together sugar, corn syrup, and water until the sugar starts to dissolve, then stop stirring and let the heat do the work. This matters more than you'd think because stirring once it boils can cause crystallization that ruins the whole batch.
- Reach hard crack stage:
- Bring everything to a boil over medium-high heat without stirring, and watch your candy thermometer like a hawk because the difference between perfect and burnt is maybe thirty seconds. You're aiming for 300°F, which should take about seven to eight minutes depending on your stove.
- Add your color:
- Remove the pan from heat and stir in your red food coloring quickly but gently, being careful because the steam rising up is legitimately hot enough to burn your face. The coating will darken slightly as it cools, so don't panic if it looks too bright at first.
- Dip with confidence:
- Working as quickly as you can manage without burning yourself, grab an apple chunk by its toothpick and dunk it into the candy coating in one smooth motion, swirling gently to coat all sides. Let the excess drip off for just a second, then place it on your prepared tray and immediately sprinkle with any toppings if you're using them.
- Let them set:
- Leave everything untouched at room temperature for at least an hour, though overnight is even better because it gives the coating time to harden into that satisfying brittle shell. Resist the urge to touch them or move them around because they're still soft until they're completely cool.
 Save
Save There was this one time my mother-in-law came over right as I was pulling the last batch off the tray, and she sat at my kitchen counter eating them one after another while telling me stories about making candied apples with her own mother decades ago. It turned into this beautiful moment where food became a bridge between generations, and I understood why she'd passed down that love of making things for people to my husband. Now whenever I make these, I think of her hands and the care that went into everything she created.
The Science Behind the Shine
The magic of this recipe lives in that hard crack stage, which is when sugar molecules reach a temperature where they lock into a glassy, brittle structure instead of staying chewy or crystalline. I learned this the hard way by burning an entire batch my first attempt, and now I respect the thermometer like it's holding the secret to happiness. The corn syrup is equally important because it contains different sugar molecules that interfere with crystallization, giving you that smooth, glossy finish instead of a grainy mess. Temperature control sounds intimidating but it's actually simpler than most cooking because you're just watching one number climb to a specific target.
Variations That Actually Work
I've experimented with every variation I can think of, and some stick around while others quietly disappear from my rotation. Green food coloring looks stunning and feels more sophisticated, while purple coating with chopped pistachios became my go-to for autumn gatherings. The most unexpected success was using crushed freeze-dried strawberries mixed into the coating, which added actual flavor instead of just color. My family now votes on which version they want me to make, and somehow I always end up making all three anyway.
Storing and Sharing These Bites
These keep beautifully in an airtight container at room temperature for up to three days, though they've never lasted that long in my house because people keep opening the container and eating them straight. If you're making them for an event, you can prepare them the day before and store them between parchment layers so they don't stick together. I've learned that these travel surprisingly well if you pack them carefully in a sturdy box with padding, making them perfect for gifts or bringing to someone's house.
- Pack them in a pretty container or box lined with parchment paper for a gift that feels genuinely homemade and thoughtful.
- Keep them away from humidity because moisture is the one thing that will make the coating lose its shine and become sticky.
- If they somehow get soft, a low oven for five minutes can re-crisp them back to their original texture.
 Save
Save These little bites have become my answer when someone asks what to bring or what to make, because they're somehow fancy enough for parties but casual enough for random Tuesday snacking. Every time someone takes one, there's this moment of surprise and delight that never gets old.
Recipe FAQs
- → What type of apples work best for these bites?
Crisp apples like Granny Smith or Fuji are ideal for their firm texture and tart-sweet balance.
- → How do I know when the candy coating is ready?
The mixture should reach the hard crack stage, about 300°F, ensuring a crisp and shiny finish.
- → Can I add toppings to the candy coating?
Yes, sprinkling nuts, mini chocolate chips, or sprinkles immediately after dipping adds flavor and texture.
- → How should I prepare the apple chunks before coating?
Core and cut apples into one-inch pieces, then pat them dry thoroughly to help the coating adhere better.
- → What safety tips should I follow while making the candy coating?
The candy mixture is extremely hot; handle with care and avoid stirring once boiling to prevent crystallization.