 Save
Save My daughter came home from school one March afternoon with a drawing of a bunny and a list of desserts she wanted for her Easter party. These little cakes were her top choice, and watching her face light up when I pulled them from the oven—golden, puffy, and waiting to become her favorite characters—made me realize this recipe was going to be a keeper. The best part wasn't the baking, though; it was thirty minutes later when she and her cousins sat at the kitchen table with frosting on their noses, arguing over whose bunny looked the silliest.
The magic really happened when I made a triple batch for my neighbors' combined Easter gathering. Three dozen bunnies lined the dessert table, and I watched adults who claimed they were 'too old for cute food' sneaking seconds when they thought no one was looking. That's when I knew these cakes had transcended the kids' party category entirely.
Ingredients
- All-purpose flour: The foundation of your tender crumb—sifting it isn't fancy, it's just how you keep the cakes light and pillowy.
- Granulated sugar: This creams with butter to trap tiny air bubbles that make the cake rise and stay soft.
- Unsalted butter: Room temperature matters more than you'd think; cold butter won't incorporate properly and you'll end up with a dense cake.
- Whole milk: Adds moisture without making the cake heavy, creating that perfect tender crumb.
- Eggs: Your binding agent and structure builder—add them one at a time so they actually incorporate rather than slide around.
- Baking powder: The lift you need; check the expiration date because old baking powder won't do the job.
- Salt: A tiny pinch that somehow makes the vanilla taste twice as vanilla-y.
- Pure vanilla extract: Not the imitation stuff if you can help it; the flavor difference is noticeable in something this simple.
- Powdered sugar: Sifting this before mixing saves you lumpy frosting headaches.
- Food coloring: Optional but fun; a tiny drop goes further than you'd expect.
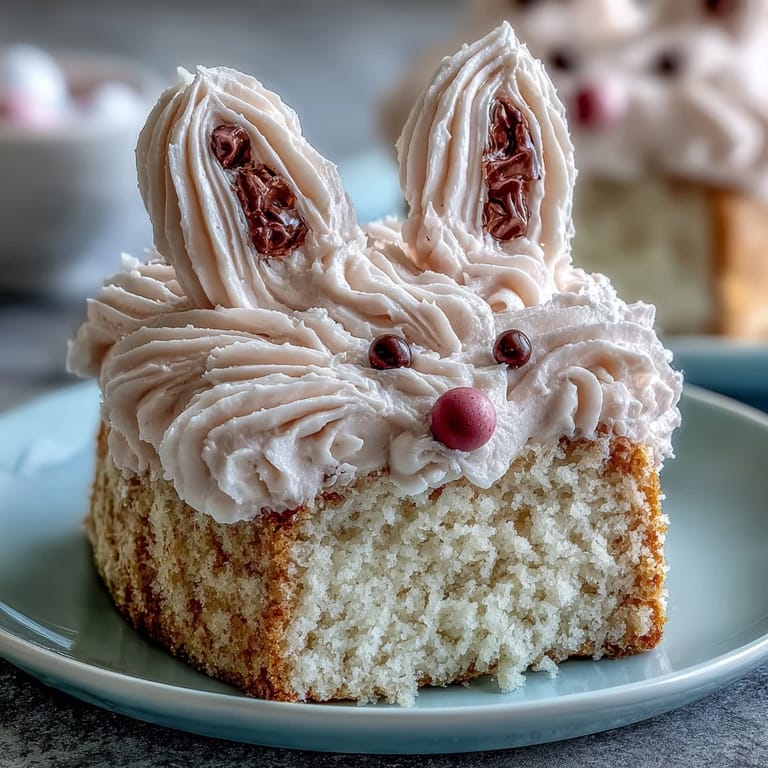
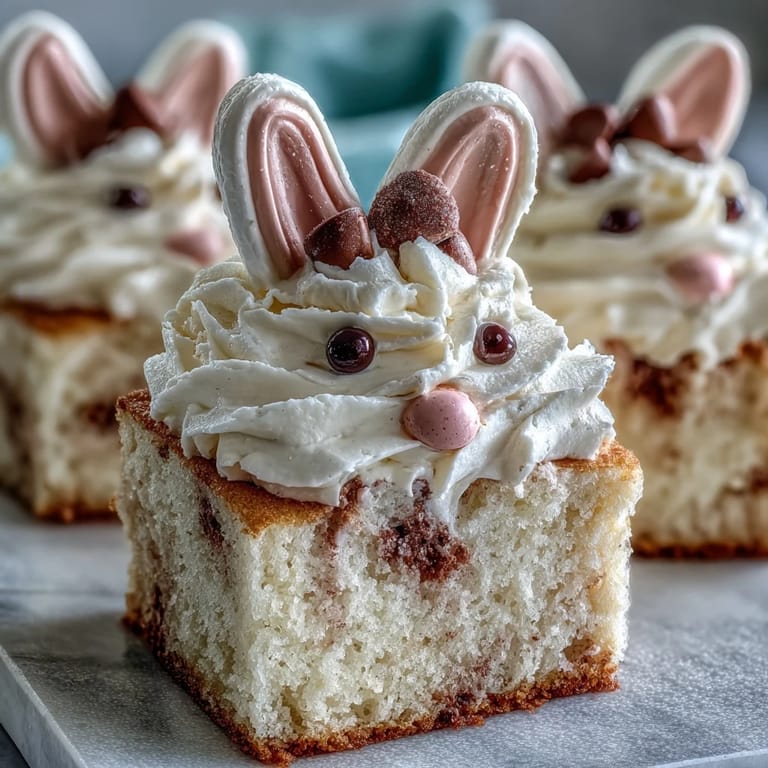
- Mini marshmallows: Cut in half with small scissors for bunny ears that actually stick to frosting without sliding.
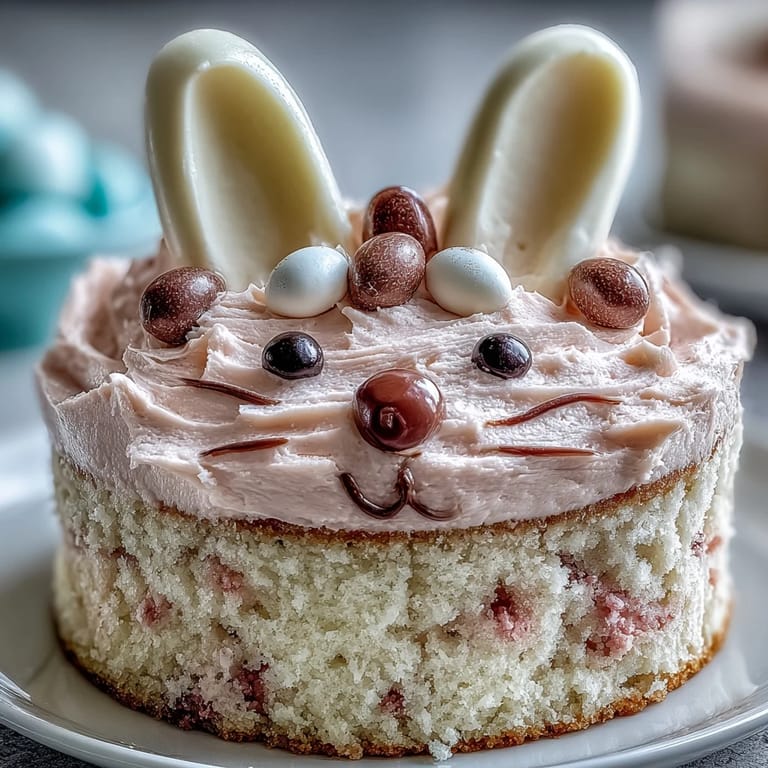
- Pink candy-coated chocolates: The bunny noses that make everyone smile—pick candies that aren't too big or they'll topple off.
- Mini chocolate chips: Just the right size for bunny eyes without overwhelming the face.
- Shredded coconut or green sprinkles: Creates the grass that ties the whole scene together.
Tired of Takeout? 🥡
Get 10 meals you can make faster than delivery arrives. Seriously.
One email. No spam. Unsubscribe anytime.
Instructions
- Prepare your workspace:
- Preheat your oven to 350°F and line a 12-cup muffin tin with paper liners or grease each cup well. Cold spots in your oven bake unevenly, so give it a few extra minutes to actually reach temperature.
- Create the fluffy base:
- Cream butter and sugar together until it looks pale and pillowy—about two to three minutes with an electric mixer. This step is where the magic happens; you're basically whipping air into the mixture.
- Marry the eggs carefully:
- Add eggs one at a time, beating well between each addition so they actually blend into the batter rather than sitting on top. Add your vanilla at the end and give it one more good mix.
- Combine the dry goods:
- Whisk flour, baking powder, and salt together in a separate bowl, breaking up any tiny clumps. This simple step prevents streaks of unmixed flour in your finished cakes.
- Alternate wet and dry:
- Add half the flour mixture, then half the milk, mix gently until just combined, then repeat with the remaining ingredients. Stop mixing the second you don't see streaks of flour; overmixing toughens the crumb.
- Fill the muffin cups:
- Divide batter so each cup is about two-thirds full, leaving room for the cakes to rise without spilling over. Use an ice cream scoop for even portions that bake consistently.
- Bake until golden:
- Bake for eighteen to twenty minutes until a toothpick inserted into the center comes out clean with maybe a tiny crumb or two clinging to it. Don't open the oven door before the eighteen-minute mark or you'll deflate all your careful work.
- Cool completely:
- Let the cakes cool in the pan for five minutes, then turn them out onto a wire rack to cool completely before frosting. Frosting warm cakes means the frosting slides right off, so patience here pays off.
- Whip the frosting:
- Beat softened butter until creamy, then gradually add sifted powdered sugar while beating constantly. Add milk and vanilla, then beat until the frosting is light and fluffy—about two minutes of beating.
- Tint if you're feeling festive:
- Divide frosting into small bowls and add just a tiny drop of food coloring to each; the color deepens as you mix. You can always add more color, but you can't take it out.
- Frost each little cake:
- Use a spatula or piping bag to frost the domed top of each cake generously. This is where the buttercream becomes the canvas for your bunny faces.
- Assemble your bunnies:
- Cut marshmallows in half lengthwise for ears, press them into the top of the frosted cakes, add a pink candy nose, and use a toothpick dipped in chocolate to create two eyes. Have fun with it—wobbly ears add character.
- Create the grassy scene:
- Arrange cakes on a platter and surround them with shredded coconut or green sprinkles to look like grass. This finishing touch transforms individual cakes into a cohesive Easter scene.
 Save
Save What touched me most was when a parent texted a photo weeks later of their kid still talking about those bunnies. That's when a recipe stops being just instructions and becomes a small memory that families carry forward.
Decorating Like a Pro
The secret to making these look professionally done without actually being a pastry chef is in the frosting consistency and the placement of details. You want frosting thick enough that it holds its shape but spreadable enough that you're not wrestling with the spatula. If your frosting seems too soft, pop it in the fridge for ten minutes and try again.
Making It Your Own
These cakes are versatile enough to adapt to whatever you have on hand or whatever dietary restrictions your guests have. Swap vanilla for chocolate cake if that's what your crowd prefers, or use dairy-free butter and milk for allergy-friendly versions that taste just as good. The bunny decoration concept works with any flavor combination you choose.
Timing and Storage Tips
You can bake the cakes a full day ahead and store them in an airtight container at room temperature, then frost and decorate on party day for minimal last-minute stress. Frosted but undecorated cakes also keep beautifully in the fridge for up to three days, so you have flexibility depending on your schedule. The finished decorated cakes are best eaten within twenty-four hours while the frosting is at its fluffiest.
- Bake the day before your event and store cakes in an airtight container to let the crumb set and stay moist.
- Frost and decorate as close to serving time as possible so marshmallow ears stay firm and candies don't sink into soft frosting.
- If you're making these for a large gathering, set up a decoration assembly line where different people add ears, eyes, and noses in stages.
 Save
Save These little cakes prove that impressive desserts don't require complicated techniques or fancy ingredients, just a willingness to show up and make something with care for the people you're feeding. Every time you bake them, you're creating the kind of small joy that lingers long after the last crumb is gone.
Recipe FAQs
- → What is the best way to make the cake moist?
Use softened butter and whole milk as specified, and avoid overmixing the batter to keep the sponge tender and moist.
- → How can I ensure the buttercream is fluffy?
Beat the butter until creamy before gradually adding powdered sugar and milk. Continue to beat until light and airy for a fluffy texture.
- → Can these mini cakes be made dairy-free?
Yes, by substituting dairy-free butter and plant-based milk, you can create allergy-friendly versions without compromising texture.
- → What decorations can be used for the bunny features?
Use mini marshmallows for ears, pink candy-coated chocolates for noses, mini chocolate chips for eyes, and shredded coconut or sprinkles for grass.
- → How should I store the mini cakes after decorating?
Store them in an airtight container at room temperature for up to two days or refrigerate for longer freshness, bringing them to room temperature before serving.
- → Is it necessary to use edible markers in decoration?
No, edible markers are optional and can be used to add fine details, but mini chocolate chips and candies provide sufficient decoration.