 Save
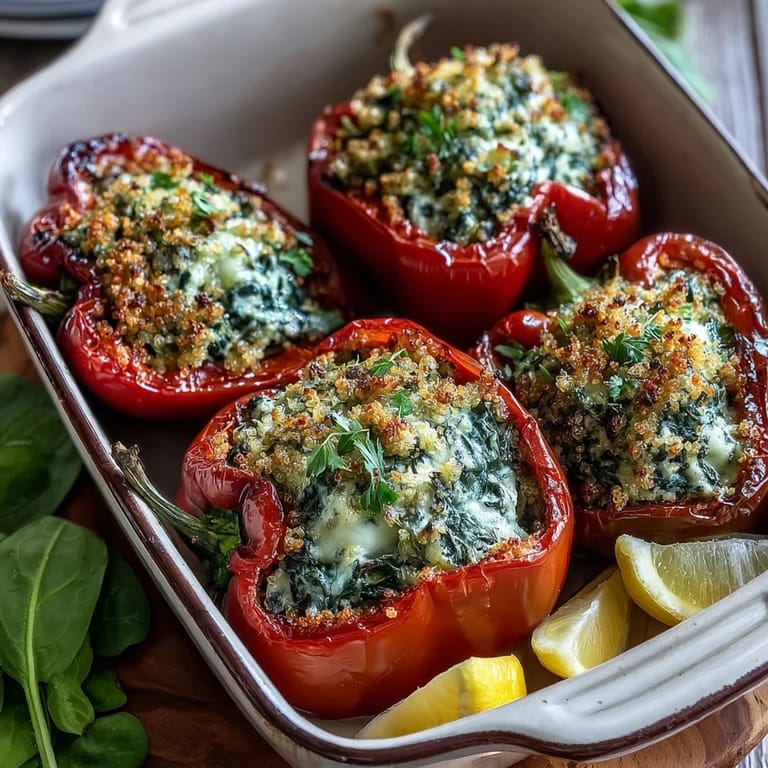
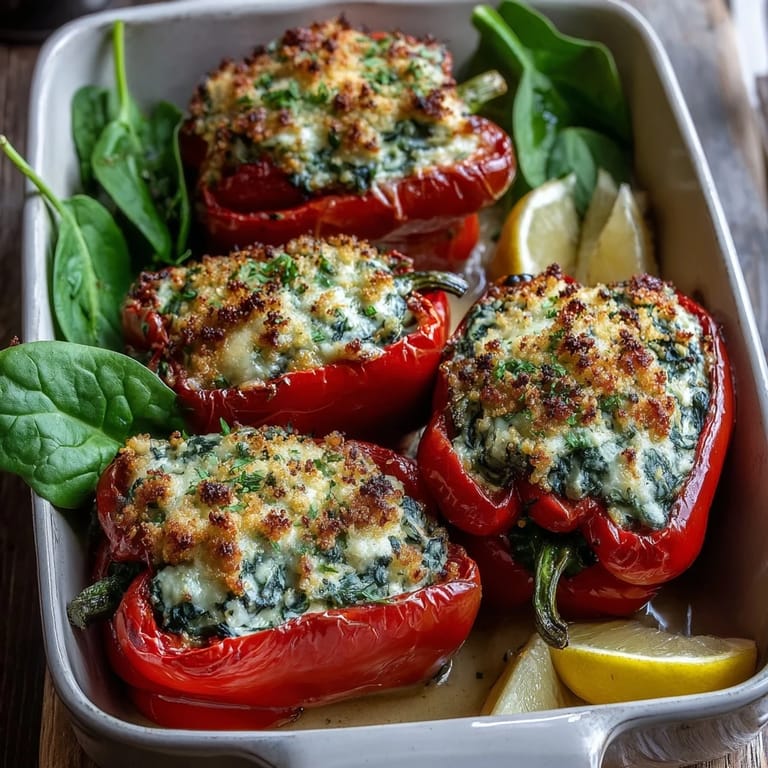
Save My roommate texted me a photo of these stuffed peppers from a restaurant, and I stared at it for a solid minute before realizing I could make something even better at home. The vibrant colors alone were calling to me, but it was the promise of creamy, savory filling that sealed the deal. That first attempt turned into regular rotation in my kitchen, and now I make them whenever I want something that feels restaurant-quality but tastes like comfort. The magic happens when you blend cashews into something silky and rich, then pair it with earthy spinach and tender artichokes.
I made these for my sister's book club last spring, and watching everyone take that first bite is still one of my favorite kitchen memories. Someone asked if I'd catered it, and I actually blushed a little before admitting I'd made them that afternoon. The compliments kept coming, but the real win was when my meat-eating uncle asked for the recipe, and not in a polite way.
Ingredients
- Bell peppers (4 large, any color): Choose peppers that sit flat on their bottoms so they don't tip over while baking; I've learned the hard way that wobbly peppers mean uneven cooking and spilled filling.
- Fresh spinach (2 cups, chopped): The volume shrinks dramatically when cooked, so don't be shy with how much you pile in the skillet.
- Canned artichoke hearts (1 cup, drained and chopped): Drain them thoroughly and chop them small so they distribute evenly and don't clump in one pepper.
- Onion (1 small, finely chopped) and garlic (2 cloves, minced): These create the aromatic foundation that makes people ask what smells so good before they even taste it.
- Cooked quinoa (1 cup): Brown rice works beautifully too, and using grain you've already cooked saves time while adding texture and substance.
- Raw cashews (1/2 cup, soaked 2 hours): Don't skip the soaking step; this is what transforms them into the creamy texture that replaces cheese entirely.
- Unsweetened plant-based milk (1/2 cup): Oat milk creates the richest consistency, but almond and soy work just fine.
- Nutritional yeast (2 tablespoons): This ingredient delivers that savory, umami-forward taste that makes the dish feel complete and satisfying.
- Lemon juice (1 tablespoon) and Dijon mustard (1 teaspoon): These add brightness and depth, cutting through the richness so the filling doesn't feel heavy.
- Salt (1/2 teaspoon) and black pepper (1/4 teaspoon): Season as you blend the cashew cream; you can always add more, but you can't take it out.
- Breadcrumbs (1/4 cup) and olive oil (1 tablespoon for topping): The breadcrumbs toast golden and crispy in the oven, adding a textural contrast that elevates every bite.
Tired of Takeout? 🥡
Get 10 meals you can make faster than delivery arrives. Seriously.
One email. No spam. Unsubscribe anytime.
Instructions
- Heat your oven and prep the peppers:
- Preheat to 375°F and lightly brush a baking dish with olive oil, then stand your hollowed peppers upright like little edible bowls waiting to be filled. You'll feel how sturdy they are once they're arranged, which is reassuring.
- Build the savory base:
- Sauté your finely chopped onion in a skillet with a splash of olive oil until it becomes translucent and soft, about 3 minutes. Add minced garlic, then the spinach and artichokes, cooking until the spinach collapses into the pan, which takes roughly 2 minutes and smells incredible.
- Create the creamy magic:
- Combine your drained soaked cashews, plant-based milk, nutritional yeast, lemon juice, Dijon mustard, salt, and pepper in a blender, then blend until completely smooth and cloud-like. This is the heart of the dish, so taste it as you go and adjust seasonings to your preference.
- Combine everything together:
- In a large bowl, fold together the sautéed vegetables, cooked quinoa, and cashew cream until everything is evenly distributed and no streaks of cream remain visible. The mixture should look creamy but substantial, holding together when you scoop it.
- Fill the peppers generously:
- Spoon the filling into each pepper, pressing down lightly as you go to pack it in without crushing the pepper walls. You'll feel when you've filled them properly, and they should look generous but not overflowing.
- Add the crispy topping:
- Mix breadcrumbs with one tablespoon of olive oil in a small bowl, then scatter this mixture evenly over the top of each pepper. This creates the textural contrast that makes everyone ask what that golden layer is.
- Bake low and slow, then finish:
- Cover the baking dish with foil and bake for 25 minutes, allowing the peppers to soften and the filling to heat through completely. Remove the foil and bake for another 10 minutes until the breadcrumb topping turns golden brown and smells toasty.
- Rest before serving:
- Let the peppers cool for 5 minutes so they firm up just slightly and become easier to handle. This brief pause also lets everything settle and come together in flavor.
 Save
Save There's a moment when you pull these out of the oven and see that golden breadcrumb topping catching the light where you remember why you love cooking. It's not just food; it's proof that you can create something beautiful and nourishing without any animal products, and that realization hits different every single time.
Flavor Variations That Work Beautifully
Once you master the base recipe, playing with additions becomes pure joy. I've stirred in chopped sun-dried tomatoes for sweetness, added roasted red peppers for smokiness, and even experimented with fresh basil for an Italian twist. Pine nuts sprinkled on top add crunch if you want to elevate it further, and a pinch of smoked paprika in the filling delivers unexpected depth that no one can quite identify until you tell them.
What to Serve Alongside
These peppers are hearty enough to stand alone, but they shine brightest when surrounded by something crisp and fresh. A simple green salad with lemon vinaigrette cuts through the richness perfectly, while roasted broccoli or steamed green beans add color to the plate without competing for attention. I've also served them with a small side of hummus or tahini sauce, which adds another layer of creaminess that guests absolutely love.
Timing and Make-Ahead Wisdom
You can assemble these stuffed peppers several hours ahead, cover them with plastic wrap, and refrigerate until you're ready to bake. Just add 5 to 10 minutes to the cooking time if they go straight from cold to hot, and everything will work out beautifully. If you find yourself with leftovers, they reheat perfectly in a covered baking dish at 350°F for about 15 minutes, and they actually taste even better the next day once all the flavors have melded together.
- Soak your cashews the night before if you're planning ahead, then you'll have zero stress on cooking day.
- Chop all your vegetables before you start cooking, which means you can move through the steps without scrambling.
- The filled peppers are actually more forgiving than you'd think, so don't worry if your filling isn't perfectly even in each one.
 Save
Save These stuffed peppers became my go-to dish for showing people that vegan cooking isn't restrictive or boring, it's just different in all the right ways. Every time someone comes back for seconds or asks for the recipe, I know I've created something that matters.
Recipe FAQs
- → Can I make these stuffed peppers ahead of time?
Yes, prepare the filling and stuff the peppers up to 24 hours in advance. Store covered in the refrigerator, then bake when ready to serve.
- → What can I substitute for cashews?
White beans or silken tofu blended with nutritional yeast creates a similar creamy texture. For nut-free options, try sunflower seeds or a vegan cream cheese base.
- → How do I store leftovers?
Keep cooled stuffed peppers in an airtight container for 3-4 days. Reheat in a 350°F oven for 15 minutes or microwave until warmed through.
- → Can I freeze these stuffed peppers?
Freeze assembled unbaked peppers for up to 3 months. Thaw overnight in the refrigerator, then bake as directed. Already baked peppers also freeze well.
- → What other grains work in this filling?
Brown rice, farro, wheat berries, or even cauliflower rice make excellent substitutions. Adjust cooking time accordingly for your chosen grain.