 Save
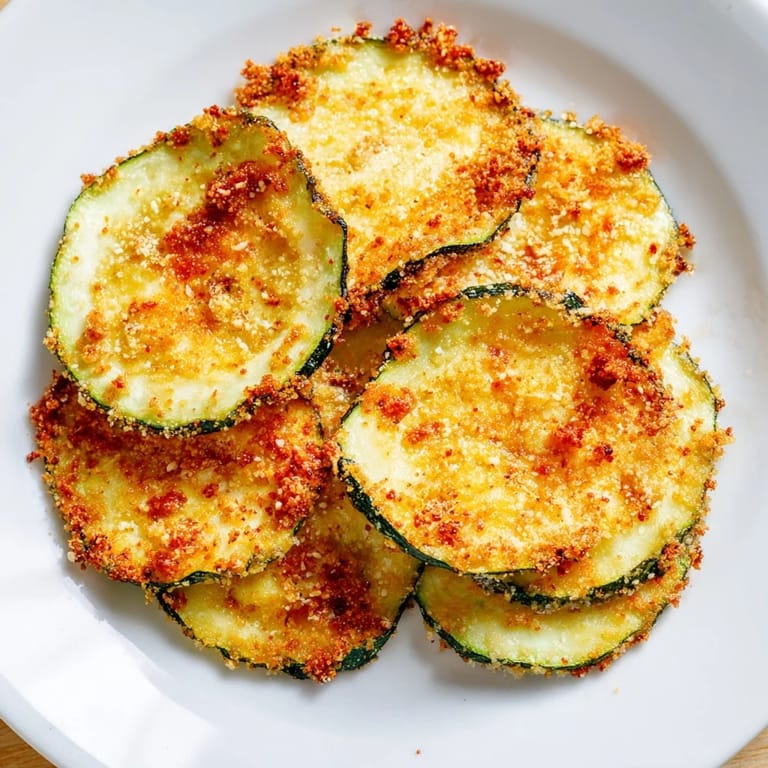
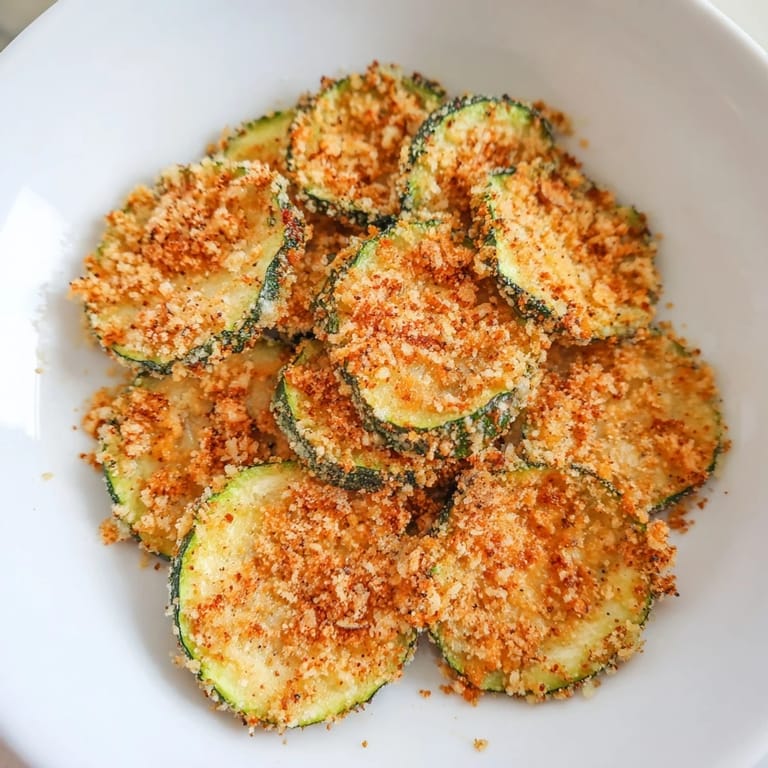
Save I discovered zucchini chips by accident one summer when my neighbor dropped off a bag of garden zucchini the size of baseball bats. Rather than roast them whole or hide them in bread, I started slicing them thin and wondered if they could become something crunchy. That first batch in my air fryer came out golden and crispy, nothing like the soggy attempts I'd made before, and suddenly I had a snack that tasted indulgent but felt genuinely good to eat.
I made these for a game night, skeptical that anyone would care about zucchini chips when pizza was also on the table. But halfway through the movie, the bowl was empty and someone asked if I'd make them again next time. That's when I realized the crispy exterior and tender inside had crossed over from healthy-option territory into legitimate snack status.
Ingredients
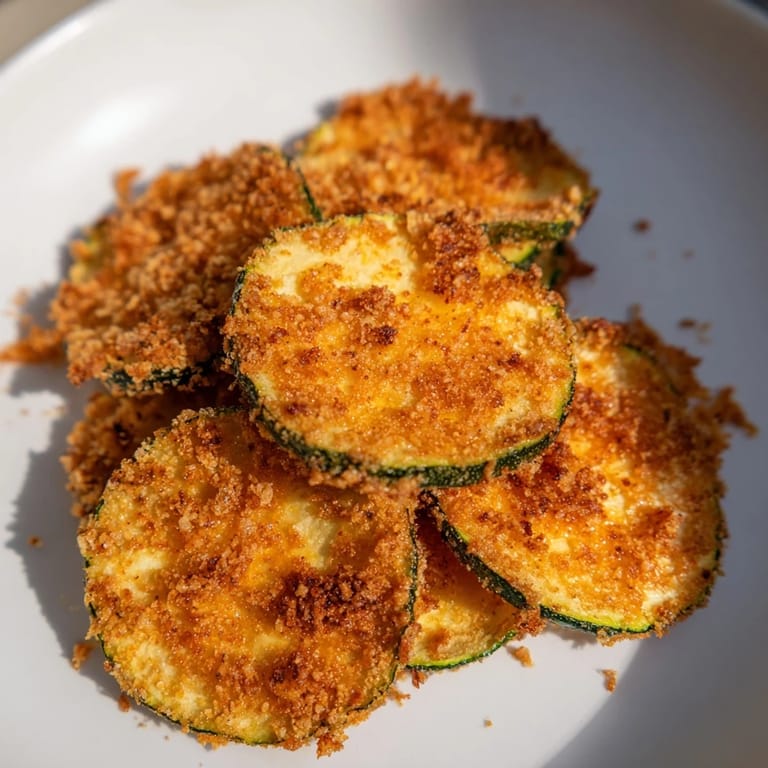
- Zucchini: Medium-sized ones slice thin enough to crisp up without turning mushy, and they have fewer seeds than the massive garden varieties.
- Panko breadcrumbs: They're coarser than regular breadcrumbs, which means a crunchier, more satisfying texture when air-fried.
- Parmesan cheese: Adds a sharp, salty depth that makes these taste less like a health food and more like an actual snack.
- Garlic powder and smoked paprika: These two seasonings do the heavy lifting, creating flavor complexity without needing a long ingredient list.
- Eggs: They act as the glue that keeps breadcrumbs clinging to the zucchini instead of flying off in the air fryer.
- Olive oil spray: A light mist transforms them from crispy to extra-crispy, though it's truly optional if you're watching calories.
Tired of Takeout? 🥡
Get 10 meals you can make faster than delivery arrives. Seriously.
One email. No spam. Unsubscribe anytime.
Instructions
- Set your air fryer to 400°F and let it warm up:
- The preheat matters more than you think because cold air fryers cook unevenly and sometimes won't crisp the bottom properly.
- Dry your zucchini slices thoroughly:
- Use paper towels and don't be shy about it; moisture is the enemy of crispiness and will steam them instead of crisping them.
- Mix your breading in a shallow bowl:
- Panko, Parmesan, garlic powder, smoked paprika, salt, and pepper go together here, and stirring them together distributes the seasoning evenly so no slice tastes bland.
- Set up your dredging station:
- Beaten eggs in one bowl, breadcrumb mixture in another, and work from left to right so you're not double-dipping wet hands into the crumbs.
- Coat each slice like you mean it:
- Dip it in egg, let the excess drip off for a second, then press both sides gently into the breadcrumb mixture and tap off the excess; this is what creates that satisfying crunch.
- Arrange them in the basket with space between:
- They need air to circulate or they'll steam instead of fry, so don't crowd them and work in batches if you have to.
- Spray lightly with olive oil if you want maximum crispiness:
- This step transforms them from good to golden-brown beautiful.
- Air-fry for 8 to 10 minutes, flipping halfway:
- At the halfway point, use tongs to flip each slice so both sides get that even, golden color.
 Save
Save My daughter, who lives on chicken nuggets and refuses most vegetables, ate half the batch before I could even photograph them. Watching her dip them in ranch and actually enjoy zucchini felt like a quiet victory, the kind of parenting moment that doesn't make headlines but stays with you.
Flavor Variations to Try
The beauty of this recipe is how easily it adapts to different moods. I've made spicy versions with chili flakes mixed into the breadcrumb coating, Italian herb versions with dried basil and oregano instead of smoked paprika, and even a curry-forward batch that surprised me with how well it worked. Each variation takes the same basic technique and feels entirely different, so once you nail the core method, you can experiment without fear of failure.
Serving and Storage Tips
These are best eaten hot and crispy, straight from the air fryer, though they'll stay crunchy in an airtight container for a couple of days if you have leftovers. I've reheated them in the air fryer for just a few minutes when I wanted to bring back the crispness, and it works better than the regular oven or microwave ever could. They go with ranch, marinara, a spicy mayo, or honestly just eaten plain with your fingers while standing at the counter.
Why This Became My Go-To Snack
What started as a way to use up zucchini has become the recipe I make whenever I want something that feels indulgent without the guilt, or when I need a snack that actually satisfies instead of leaving me wanting more. It's the kind of recipe that proves healthy eating doesn't have to be boring or feel like you're missing out.
- Make them ahead and store in an airtight container for up to three days.
- If you don't have an air fryer, a 400°F oven works too, though watch them closely so they don't burn.
- Double or triple the batch because they disappear faster than you'd expect.
 Save
Save These zucchini chips have become the snack I reach for when I want something that tastes good and doesn't leave me feeling weighed down. There's real joy in discovering that something this simple can be this satisfying.
Recipe FAQs
- → How do I achieve extra crispiness?
Lightly spray the coated zucchini slices with olive oil before air-frying for a crispier texture.
- → Can I make this gluten-free?
Yes, substitute regular panko breadcrumbs with gluten-free alternatives to suit dietary needs.
- → What temperature is best for air-frying?
Preheat the air fryer to 400°F (200°C) for optimal crispness and even cooking.
- → How thin should the zucchini slices be?
Slice the zucchini thinly to ensure quick cooking and a crispy finish without sogginess.
- → Are there dairy-free options?
Yes, replace Parmesan cheese with nutritional yeast for a dairy-free and savory coating.